Looking to expand your orchid collection? Wondering how to divide orchids when repotting? You've come to the right place! Dividing orchids is a fantastic way to propagate these stunning plants and create new flower displays. In this guide, we'll delve into the simple steps you can take to divide your orchids successfully, ensuring healthy growth and vibrant blooms.
If you're ready to elevate your gardening game and unlock the secrets of successful orchid division, this post is for you. We'll cover essential tips, techniques, and everything in between that will empower you with the knowledge needed for thriving orchids. Get ready to witness your precious orchid collection flourish like never before!
Key Takeaways
-
Repotting orchids is essential for their health and growth, and timing is crucial for successful repotting.
-
Identifying the specific type of orchid is important as different types may have varying repotting needs.
-
When dividing and repotting orchids, ensure cleanliness to prevent infections and promote healthy growth.
-
Follow the recommended steps for orchid division and repotting to double or triple your orchids without additional cost.
-
After division and repotting, provide proper post-care to ensure the well-being of the orchids.
-
Avoid common mistakes such as overwatering or using the wrong type of potting mix to maintain the health of your orchids.
Repotting Essentials
Orchid Division Benefits
When repotting orchids, dividing them can have several benefits. It helps prevent overcrowding in the pot, allowing each plant to receive adequate nutrients and space for growth. Dividing orchids also promotes better air circulation around the roots, reducing the risk of root rot and other diseases. It gives you the opportunity to propagate new plants from existing ones, expanding your collection or sharing with fellow enthusiasts.
Repotting orchids is essential for their overall health and well-being. Over time, the potting mix breaks down and becomes compacted, hindering drainage and aeration. By repotting, you provide fresh growing medium that allows proper airflow to the roots while ensuring efficient water drainage. This process also enables you to inspect the roots for any signs of disease or decay so that necessary actions can be taken promptly.
Importance of Repotting Orchids
Choosing the right time to repot your orchids is crucial for their successful transition to new pots. Typically, it's best to repot them after they have finished flowering but before new growth begins. This timing ensures minimal disruption to their natural growth cycle while giving them a fresh start in a new environment.
Selecting suitable pots and potting mix is equally important when preparing for orchid division during repotting. Opt for pots with sufficient drainage holes at the bottom to prevent waterlogging, which can lead to root rot. The pot size should accommodate the individual needs of each divided orchid while providing room for future growth without being excessively large.
When choosing a potting mix for your divided orchids, consider using a specialized blend designed specifically for orchids' unique requirements. Look for mixes that offer excellent drainage properties yet retain enough moisture to support healthy root development.
Orchid Repotting Timing
Ideal Season - Advantages of dividing orchids - Promoting new growth and blooming - Preventing overcrowding and disease spread
Timing is crucial. Dividing orchids during the right season offers several benefits. First, it promotes new growth and encourages more prolific blooming. By dividing the plant at the optimal time, you give each division a chance to establish itself before its natural flowering period.
Moreover, dividing orchids prevents overcrowding within the pot or container. Over time, as an orchid grows, its roots can become densely packed in the potting medium. This can lead to restricted airflow and increased risk of disease due to excess moisture retention.
Another advantage of dividing orchids is that it helps prevent the spread of diseases. When an older plant becomes infected with a disease or pest infestation, separating healthy divisions from affected parts can save them from being compromised.
Growth Cycle Considerations - Identifying the best season for orchid division - Considering the plant's growth cycle - Optimal environmental conditions for successful division
Identifying the best season for orchid division depends on understanding your specific type of orchid and its growth cycle. For many species, spring is an ideal time for this process because they are typically entering their active growing phase after winter dormancy.
However, some varieties may have different growing seasons based on their natural habitat or hybridization history. Researching your specific type of orchid will help you determine when it's most conducive to divide them without causing undue stress.
Considering your plant's individual growth cycle is essential too; if you notice signs of vigorous root development or new shoots emerging from pseudobulbs, these are indications that your orchid might be ready for division soon.
Lastly, providing optimal environmental conditions during this process greatly contributes to successful division. Ensuring proper humidity levels and temperature stability in your repotting area will minimize transplant shock and support faster recovery post-division.
Identifying Orchid Types
Species Recognition - Understanding the stages of orchid growth
Orchids come in various types, each with its own unique characteristics. It's crucial to understand the different growth stages of orchids to determine the ideal time for division when repotting. For instance, some orchids have distinct growth cycles, such as a dormant period or a specific flowering season. Recognizing these stages is essential in deciding when to divide them.
Understanding the timing based on the growth cycle is vital. Some orchids develop new roots during certain periods, making it more favorable to divide them during those times. For example, if an orchid typically enters a phase of active root development after blooming, dividing it immediately after flowering can promote healthier growth and establishment of new plants.
Importance of Orchid Repotting
Health Benefits
It's essential to consider the health benefits. Assessing if your orchids are suitable for division is a crucial step. Factors such as overcrowding, decreased blooming, or stunted growth can indicate that division is necessary. If you notice crowded roots circling around the pot or emerging from the drainage holes, it may be time to divide your orchid.
On top of that, identifying signs that indicate readiness for division is pivotal. For instance, if you observe new growths and healthy pseudobulbs in an otherwise crowded container, this could signal that your orchid is ready for division. By dividing the plant at this stage, you can promote its overall health and ensure continued vibrant blooms.
Growth Enhancement
Dividing orchids when repotting plays a crucial role in promoting overall plant health. Through division, you can prevent disease and pest infestations commonly associated with overcrowded root systems. Enhancing nutrient absorption and utilization becomes more effective after dividing an overgrown orchid.
Moreover, by separating a healthy portion of the plant during repotting, you provide ample space for new roots to develop and spread out within their new containers. This process not only stimulates healthier growth but also encourages better water retention within the potting medium.
Preparing for Division and Repotting
Tools and Materials
When dividing orchids during repotting, it's crucial to have the right tools and materials. You'll need a sharp, sterilized knife or shears to cut through the rhizome. Prepare some pots with fresh potting mix, as well as labels for identifying each division.
Dividing orchids stimulates growth by allowing each new division to develop independently. This process encourages stronger root development in each plant, leading to healthier growth overall. By dividing your orchid when repotting, you can maximize its flowering potential by ensuring that each division has ample space and nutrients.
Workspace Setup
To successfully divide and repot your orchid, set up a clean workspace with all the essential tools at hand. Make sure your knife or shears are sharp and sanitized before use. Select appropriate materials such as fresh potting mix suitable for your specific type of orchid.
Cleanliness is key when dividing and repotting orchids; ensure that all tools are properly sterilized to prevent any infections from spreading among the divisions. By maintaining a clean workspace and using sterile tools, you can promote healthy growth in your divided orchids.
Orchid Repotting and Division Steps
Unpotting Carefully
When dividing orchids during repotting, it's crucial to create an organized workspace. This ensures that all necessary tools are within reach, preventing unnecessary delays. A suitable area for division activities should be set up with proper lighting and ventilation to facilitate the process.
Gentle unpotting techniques are essential to minimize root damage when dividing orchids. By carefully removing old potting material without harming the roots, you can ensure the health of the plant post-division. Proper care during this step sets the foundation for successful orchid division.
Root Inspection
Before diving into the division process, it's important to thoroughly inspect the orchid roots. This involves examining their health and condition while identifying any signs of disease or rot. Assessing root structure is critical as it determines how best to approach the division without causing harm.
Minimizing root damage during unpotting is vital for ensuring that your orchid remains healthy throughout and after repotting. By gently handling the roots and employing meticulous techniques, you can safeguard them from unnecessary harm.
Division Technique
Once root inspection is complete, careful consideration of their structure will guide how best to proceed with orchid division. Understanding their layout helps determine where natural divisions lie so that separation can occur with minimal disruption.
Doubling or Tripling Orchids for Free
When dividing orchids during repotting, it's crucial to apply the correct method to ensure the plants' health and growth. One common technique is dividing the plant into sections with at least three healthy pseudobulbs and roots. Careful precision is essential during this process to avoid damaging any part of the plant.
To separate orchids without causing harm, start by inspecting the root system for natural separations or areas where division can occur easily. Gently tease apart these sections, ensuring that each new division has enough roots and healthy growth to thrive independently.
Another method involves using a sterile cutting tool to carefully divide the plant into multiple sections while ensuring that each section has sufficient roots and foliage to support its growth. By applying these precise methods, you can effectively double or triple your orchid collection without harming the plants.
Maintaining Cleanliness When Repotting Orchids
Sanitization Practices - Tips for successful propagation through division - Ensuring proper placement of divided sections - Providing optimal conditions for new growth
When dividing orchids during repotting, it's crucial to maintain a clean environment to ensure the success of the process. Before starting, gather all necessary tools and materials and make sure they are clean. Use rubbing alcohol or a diluted bleach solution to sterilize your cutting tools. This helps prevent the spread of diseases and ensures that the fresh cuts on the orchid remain free from contaminants.
After dividing the orchid, place each section into its own pot with fresh potting mix. Ensure that each divided section has enough space in its new container to encourage healthy root development. Provide optimal growing conditions such as appropriate lighting, temperature, and humidity levels for your newly potted orchids.
Contamination Prevention - Importance of maintaining clean working environment - Using sterilization techniques to prevent contamination - Minimizing the risk of introducing pathogens
Maintaining a clean working environment is essential when dividing orchids during repotting. Regularly sanitize your work area by wiping down surfaces with disinfectant wipes or using a diluted bleach solution on hard surfaces. This reduces the risk of introducing harmful pathogens that could negatively impact your newly propagated plants.
Using sterilization techniques can further help prevent contamination during orchid division. Always wash your hands thoroughly before handling any plant material or tools used in repotting. Consider wearing gloves to minimize direct contact between your skin and the plants' open wounds created during division.
Minimize risks associated with pathogen introduction by avoiding cross-contamination between different plants or plant parts while handling them during division and repotting processes.
Post-Division Orchid Care
Watering and Feeding
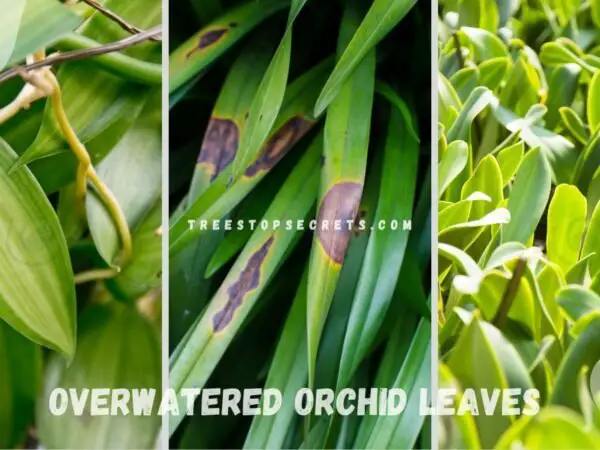
After dividing orchids when repotting, it's crucial to pay attention to their watering and feeding needs. The newly divided orchids should be watered lightly, as they may still be adjusting to the shock of division. Overwatering can lead to root rot, which is detrimental to the plants' health. As a general rule of thumb, wait until the potting medium is almost dry before watering again.
Feeding your orchids after division is also essential for their recovery and growth. However, it's important not to fertilize them immediately after division because this can further stress the plants. Once new growth is visible, you can start providing them with a diluted fertilizer solution every two weeks during the growing season.
Implementing biosecurity measures in your workspace is critical when dealing with divided orchids. This involves using clean tools and equipment while working with each plant individually to prevent cross-contamination between different specimens. For example, sterilizing your cutting tools before moving on to another plant can help minimize the risk of spreading diseases or pests.
Protecting plants from potential infections post-division is equally important for their overall well-being. Keeping an eye out for any signs of disease or pest infestation will allow you to take prompt action if necessary. By maintaining a clean and sanitized environment during post-division care, you reduce the likelihood of introducing harmful pathogens that could compromise your orchids' health.
Monitoring Growth
Properly monitoring orchid growth following division involves observing how they respond to watering and feeding practices in their new environment. It's common for divided orchids to require less frequent watering initially due to reduced root mass; however, this may vary depending on individual circumstances such as temperature and humidity levels.
Adjusting your watering schedule after repotting will depend on various factors such as climate conditions and potting medium used.
Common Mistakes to Avoid
When dividing orchids during repotting, there are several common mistakes that can hinder the plant's growth and overall health. One of these mistakes is overwatering. After division, it's crucial to monitor the growth progress of the orchid carefully. By observing how the plant responds post-division, you can make necessary adjustments to its care routine.
Tracking changes in your divided orchid's health and vitality is essential. If you notice any signs of stress or decline, such as wilting leaves or yellowing stems, it may indicate that the plant is not adjusting well to the division process. In this case, adjusting your care based on these growth patterns becomes crucial.
Conclusion
Closing Thoughts
You've now mastered the art of dividing and repotting orchids. By understanding the crucial timing, proper techniques, and post-division care, you can ensure the continued health and vibrancy of your orchids. Remember, successful division not only multiplies your orchid collection but also rejuvenates their growth, much like how a good night's rest revitalizes you for the day ahead.
Now it's your turn to put these insights into action. Grab your gardening gloves and get ready to give your orchids the TLC they deserve. With these newfound skills, you'll soon be propagating and nurturing flourishing orchids in no time!
Frequently Asked Questions
How do I know when it's time to repot my orchid?
If you notice the roots growing over the edge of the pot or water draining too quickly, it's time to repot. Also, if the potting medium has broken down, and there are no new growths despite proper care.
Can I divide my orchids during any season?
The best time to divide orchids is during their active growth period. For most types, this is typically after they have finished flowering and are showing new root and leaf growth.
What should I consider before dividing and repotting my orchids?
Ensure that each division has at least three healthy pseudobulbs or canes with roots attached. Use a sterile cutting tool to avoid infection. Prepare suitable pots with fresh potting mix for each division.
Is it possible to multiply my orchids for free through division?
Yes, by carefully dividing your mature plant into sections with at least three healthy pseudobulbs or canes in each section, you can essentially double or triple your collection without additional cost.
How do I maintain cleanliness when repotting orchids?
Cleanliness is crucial; sterilize your tools before use, work on a clean surface, and avoid contamination from pests or diseases. Proper sanitation helps prevent infections that could harm your precious plants.
Image Source: Paid image from CANVA