"Every artist dips their brush into their own soul and paints their own nature into their pictures, whether it's landscapes or portraits. The process often starts with an underpainting, a foundation that sets the tone for the final piece. Sometimes, artists find inspiration in a photo they've taken, capturing a moment in time that they can then translate onto the canvas through their paintings." - Henry Ward Beecher
Looking to unleash your creativity and bring nature's beauty to life on canvas with landscape paintings? Transform your photos into stunning works of art by incorporating underpainting techniques. In this post, we will guide you through the step-by-step process of painting a stunning pine tree using acrylics. This technique involves starting with an underpainting and then using a round brush to create the silhouette trees. By using a variety of colours, you can bring your painting to life. With its versatility and vibrant colours, acrylic paint is the perfect medium to capture the essence of a pine tree. The little alizarin crimson and ultramarine blue colours bring out the beauty of the trees.
From blocking in the basic shapes of the trees and hills to adding depth and details to their stems and colours, we will walk you through each stage of creating a realistic pine tree artwork. Discover tips and techniques for capturing the texture of pine needles, creating realistic shadows, and seamlessly blending colours using a fan brush. By the end of this post, you'll have the confidence to tackle any painting project involving trees, whether it's using a fan brush to create realistic pine trees or experimenting with different shades of alizarin crimson for the foliage. You'll also learn how to add depth and dimension to your paintings by incorporating hills into your landscapes.
So grab your fan brushes, mix those ultramarine blue colors, and let's embark on a post about painting trees together! Stay tuned for valuable insights and expert guidance on how to mix ultramarine blue and titanium white to create your very own masterpiece of trees.
Understanding Acrylic Paints
Acrylic Paint Properties
Acrylic paints are a fantastic choice for painting trees, such as a pine tree, with acrylics due to their unique properties. You can easily mix ultramarine blue and titanium white to create the perfect color for the tree. One of the key advantages of using acrylic paint is its quick-drying nature, which is especially beneficial when working with colors like ultramarine blue and titanium white. Unlike oil paints, which can take days or even weeks to dry, acrylic paint, including titanium white, dries rapidly. This allows you to work efficiently with titanium white and build layers without waiting for extended periods.
Another benefit of acrylic paints is the wide range of colors available.Having access to various shades of green is crucial. Acrylic paints offer an extensive selection of greens, allowing you to achieve the perfect color representation for your tree.
Acrylic paints are water-based, making them easy to clean up and mix. You can simply wash your brushes with water after each painting session, eliminating the need for harsh solvents or chemicals. Moreover, mixing different colors together on a palette is effortless with acrylics, enabling you to create custom shades and gradients for your pine tree artwork.
Selecting Brushes and Palettes
Choosing the right brushes is essential in creating different textures on your pine tree painting. Opt for brushes with various bristle types such as flat brushes for broader strokes and round brushes for finer details like branches and needles. By selecting appropriate brushes, you'll be able to capture the intricate details of a pine tree more effectively.
For those looking to add unique effects and textures to their artwork, consider using a palette knife alongside traditional brushes. A palette knife allows you to apply thick layers of paint or create distinct patterns by scraping through wet paint layers. Experimenting with different techniques using a palette knife can add depth and visual interest to your pine tree painting.
To ensure smooth color blending and achieve desired shades, using a mixing palette is highly recommended when working with acrylic paints. A mixing palette provides ample space for blending multiple colors together before applying them onto your canvas. It allows you to create smooth transitions between different shades of green, giving your pine tree a realistic and vibrant appearance.
Preparing the Painting Surface
Before starting your pine tree painting, it's crucial to prepare the painting surface properly. If you're working on a canvas or wooden panel, applying gesso as a primer is essential. Gesso helps improve paint adhesion and prevents the paint from seeping into the fibers of the canvas or wood, ensuring better color vibrancy and longevity.
Take the time to inspect the surface for any imperfections such as bumps or rough areas. Sanding down these imperfections will result in a smoother painting surface, allowing your brushes to glide effortlessly across the canvas or wood.
Sketching the Pine Tree Outline
To create a stunning acrylic painting of a pine tree, you need to start by sketching the outline. This step is crucial as it sets the foundation for the rest of your artwork. Let's dive in and explore how to sketch the perfect pine tree outline.
Proportions and Perspective
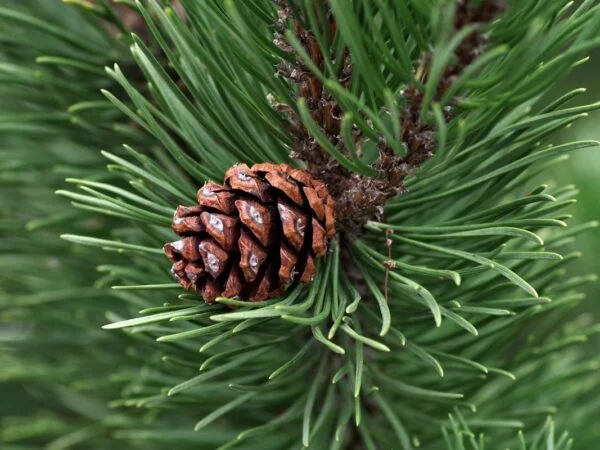
When sketching a pine tree, it's important to pay attention to its proportions and perspective. Pine trees come in various sizes, so understanding how size variations affect depth perception is key. By studying reference images or observing real-life pine trees, you can capture accurate proportions in your painting.
Imagine standing at the foot of a towering pine tree. The branches closer to you will appear larger while those farther away will seem smaller due to perspective. Keep this in mind as you sketch the branches radiating from the central trunk.
Defining the Tree Structure
Begin by outlining basic shapes and lines that represent the structure of the pine tree. Focus on creating distinct branches that spread out from the main trunk like arms reaching for sunlight. These branches should be thicker near the trunk and gradually taper off towards their ends.
Think of these basic shapes as guidelines that provide structure for your painting. They serve as a roadmap for adding details later on. Take your time with this step, ensuring that each branch flows naturally from the trunk, giving your pine tree a realistic appearance.
Erasing Guidelines
Once you have completed sketching the main structure of your pine tree, it's time to gently erase any initial guidelines that are no longer needed. Erasing these guidelines helps clean up your artwork and allows you to focus on adding finer details without distraction.
Be careful when erasing so as not to damage any underlying layers or smudge wet paint areas. Use a soft eraser or kneaded eraser for precise removal of guidelines without leaving behind any residue.
Remember, practice makes perfect! Don't be discouraged if your first attempt doesn't turn out exactly as you envisioned. Keep refining your sketching skills and experiment with different techniques to improve your pine tree outlines.
Underpainting Techniques for Pine Trees
Underpainting techniques play a crucial role in creating depth and dimension in your artwork.
Choosing Background Colors
Selecting the right background colors is essential to enhance your pine tree painting. When choosing the background, consider colors that complement and bring out the best in your pine tree. Experiment with different color schemes to achieve desired atmospheric effects behind the tree.
To make your pine tree stand out, you can also use contrasting background colors. For example, if your pine tree has predominantly cool-toned greens, you can opt for warm-toned backgrounds like oranges or yellows. This contrast will create visual interest and make the tree pop.
Creating Depth with Layers
Layering is a fundamental technique in acrylic painting that helps create a sense of depth and realism. To achieve this effect when painting pine trees, start by layering from the background to the foreground.
Begin with a light wash of color for the distant background elements such as mountains or sky. Gradually increase the level of detail as you move closer to the foreground where the pine tree resides. This gradual transition adds depth to your artwork and creates a realistic sense of distance.
Transparent glazes are an excellent tool for building up layers while maintaining transparency and luminosity in your painting. Apply thin layers of transparent glazes over previously painted areas to add dimension and richness.
As you build up layers, remember to pay attention to details such as highlights on branches or texture on bark. Adding these finer details in subsequent layers will enhance the overall realism of your pine tree painting.
By following these underpainting techniques, you can bring life to your acrylic paintings of pine trees. Remember to experiment with different color combinations and layering methods until you achieve the desired effect. With practice and patience, you'll be able to create stunning pine tree artworks that capture the beauty of nature.
Mixing Greens for Realistic Foliage
One of the essential aspects is capturing the realistic appearance of foliage. To achieve this, you need to master the art of mixing greens and understanding how light and shadow tones work in creating depth and dimension. Let's dive into these techniques!
Light and Shadow Tones
To make your pine tree look lifelike, it's crucial to grasp how light affects its appearance. Just like any other object, a pine tree has areas that are directly hit by sunlight (highlights) and areas that are in shadow (shadows). By using lighter tones for the sunlit parts and darker tones for the shadowed areas, you can create contrast and add depth to your painting.
Imagine standing under a pine tree on a sunny day. The leaves at the top will be brighter due to direct exposure to sunlight, while those underneath will be darker as they receive less light. By replicating this effect in your painting, you can give your pine tree a realistic three-dimensional look.
Experimenting with different shades of green can help you achieve this effect. Mix yellow with various amounts of blue or black to create different values of green. Remember to observe real-life examples or reference images closely to understand how light interacts with the foliage.
Adding Texture to Needles
Pine needles have a unique texture that distinguishes them from other types of foliage. To capture this texture accurately in your painting, you can employ various brush techniques.
Stippling is one technique where you use small dots or dabs of paint to mimic the appearance of individual needles. This method works well for capturing fine details and adding depth to your artwork.
Dry brushing involves using a relatively dry brush with minimal paint on it. By lightly dragging the brush across the surface, you can create subtle textures that resemble the roughness of pine needles.
Cross-hatching is another technique that can be effective in depicting the texture of pine needles. By using short, intersecting strokes, you can create a layered effect that imitates the overlapping structure of the needles.
When applying these techniques, pay attention to the directionality of your brushstrokes. Pine needles grow in specific patterns, so mimicking their natural growth pattern will enhance the realism of your painting. Study reference images or observe pine trees in person to understand how the needles are arranged.
Painting Pine Tree Trunk and Branches
One of the key elements to focus on is capturing the realistic texture and variations in the trunk and branches. This adds depth and visual interest to your artwork.
Wood Texture Details
To bring your pine tree to life, it's crucial to incorporate intricate details that mimic the natural characteristics of wood. Pay attention to elements such as knots, cracks, or grain patterns on the tree trunk. These details add authenticity and make your painting more convincing.
To achieve accurate wood texture representation, consider using fine brushes or small palette knives. These tools allow for precise application of paint strokes and help you capture the subtle nuances of wood grain. Take time to study reference images or real-life examples of pine trees to understand how these textures appear in nature. By observing these references closely, you can recreate them faithfully in your artwork.
Branch Thickness Variations
Another essential aspect when painting a pine tree is depicting variations in branch thickness. In nature, branches tend to vary in size depending on their age and position within the tree. By incorporating these variations into your painting, you can create a sense of realism and visual interest.
Begin by portraying younger branches as thinner compared to older ones. Younger branches are typically more flexible and slender, while older branches tend to be sturdier and thicker due to years of growth. Experiment with different brush sizes and pressures to achieve varied branch thicknesses throughout your artwork.
By varying branch thicknesses strategically, you can also guide the viewer's eye through your composition. Thicker branches may act as focal points or lead towards other elements within the scene. This technique helps create a dynamic composition that keeps viewers engaged.
Remember that practice makes perfect. Don't be afraid to make mistakes and learn from them. As you gain experience, you'll develop a better understanding of how to portray wood textures and branch thickness variations effectively.
Layering Foliage for a Full Canopy
One of the key elements to master is layering foliage for a full canopy. This technique allows you to create depth and realism in your artwork, capturing the lushness and density of pine needles.
Needle Clumping Effect
To achieve a natural look when painting pine needles, it's essential to cluster them together in groups rather than individually. By doing so, you can simulate the way pine needles naturally grow in clusters on branches. To create this effect effectively, use short strokes or dabs of paint.
Imagine each stroke or dab as a small group of needles gathered closely together. Vary the length and thickness of these strokes to add visual interest and mimic the organic nature of pine trees. Experiment with different brush sizes to find what works best for your desired effect.
However, while it's important to emphasize the needle clumping effect, be cautious not to overdo it. Striking a balance between realism and artistic interpretation is crucial. Too many clusters can make your painting appear cluttered or artificial. Remember that art often involves some level of abstraction, allowing you to infuse your personal style into your work.
Directional Brush Strokes
Another vital aspect in achieving a realistic depiction of a pine tree is using directional brush strokes that follow the natural growth pattern of branches and needles. By mimicking their upward growth, you can enhance the overall authenticity of your artwork.
For branches, employ vertical strokes that align with their upward direction. These strokes should radiate from the trunk outward towards the tips of each branch. The length and thickness of these strokes may vary depending on factors such as distance from the viewer or lighting conditions within your composition.
Diagonal strokes are ideal. These strokes should follow the direction of the branches, creating a sense of continuity and flow. By using consistent directional strokes throughout your painting, you can further enhance the realism and cohesiveness of your artwork.
Remember that practice is key when mastering these techniques. Experiment with different brush sizes, stroke lengths, and pressures to find what works best for you. Observe real pine trees or reference images to study their natural growth patterns and incorporate those observations into your artwork.
Adding Highlights and Shadows
To bring your pine tree painting to life, it's essential to master the art of adding highlights and shadows. By emphasizing the play of light and shadow, you can create a sense of depth and realism in your artwork.
One way to achieve this is by depicting sunlight filtering through the branches and casting shadows on the ground. Imagine a sunny day in a forest, with rays of sunlight peeking through the canopy. Use warm tones for areas hit by direct sunlight, such as the tops of branches or parts of the trunk that catch the light. This will add brightness and vibrancy to those areas.
On the other hand, shaded areas should have cooler tones. These are spots where sunlight doesn't reach directly, such as underneath branches or in dense foliage. By using cooler colors like blues or purples, you can create a contrast between the warm sunlit areas and the cool shadows.
Another technique to enhance depth perception is to utilize tricks that fool the eye into perceiving distance. Overlapping branches is one such method; it gives a sense of objects being closer or farther away from each other. By painting some branches in front of others, you can create layers within your pine tree composition.
Fading details in the background is another effective way to create depth perception. As objects recede into the distance, they become less distinct and lose detail due to atmospheric perspective. Experiment with adjusting color saturation or contrast as elements move further into the background, gradually reducing their level of detail.
Now let's talk about how you can use these techniques effectively:
-
Start by sketching out your pine tree composition on your canvas.
-
Identify where you want sunlight to hit and cast shadows.
-
Begin by blocking in basic shapes using lighter colors for sunlit areas and darker colors for shaded areas.
-
Gradually build up layers of paint, adding more definition and detail as you go along.
-
Pay close attention to the interplay of light and shadow, using highlights to bring out the form and texture of the tree.
-
Remember to consider depth perception tricks like overlapping branches or fading details in the background.
-
Continuously step back from your painting to assess how it looks from a distance and make adjustments accordingly.
By incorporating these techniques into your acrylic painting process, you can create a stunning pine tree artwork that captures the beauty of nature. Experiment with different color palettes, brushstrokes, and compositions to develop your unique style.
Detailing with Fine Brushes
Adding the final touches is crucial for achieving a realistic and captivating result. This section will delve into two important aspects of detailing: final touches on needles and enhancing tree bark realism.
Final Touches on Needles
To bring out the depth and dimensionality of the pine needles, it's essential to add highlights to certain needle clusters. By selectively applying lighter shades, you can create the illusion of light hitting specific areas, making them appear more three-dimensional. Take a step back occasionally to assess the overall balance of your painting and make any necessary adjustments.
For fine-tuning individual needles, use thin brushstrokes or a fine liner brush. This allows you to add intricate details that mimic the delicate nature of pine needles. Pay attention to the direction and length of each stroke, ensuring they align with the natural growth pattern of the tree. By doing so, you can achieve a more realistic portrayal of the pine needles.
Enhancing Tree Bark Realism
To enhance the realism of your pine tree painting, it's important to pay attention to the texture and details of the tree bark. Incorporating cracks or moss-like textures onto the bark surface adds depth and interest to your artwork. You can achieve this by utilizing dry brushing or stippling techniques with appropriate colors.
Dry brushing involves using a small amount of paint on a dry brush and lightly dragging it over the surface in quick strokes. This technique helps create texture and emphasizes any existing cracks or crevices in the bark. Stippling involves using small dots or dabs of paint to simulate moss or other organic growth on the tree trunk.
As you work on enhancing tree bark realism, keep in mind how light interacts with different surfaces. Shadows cast by branches or other elements should be considered when adding highlights and shadows onto your painting. This interplay between light and shadow adds depth and realism to the overall composition.
Acrylic Drying Time and Sealants
Understanding the drying time and using sealants is essential for achieving a successful outcome. Let's dive into the details of these two important aspects.
Drying Phases of Acrylics
Acrylic paints go through different drying phases, starting from initial tackiness to complete dryness. It's crucial to have a good grasp of these phases to avoid any mishaps during the painting process. Allow me to break it down for you:
-
Initial Tackiness: After applying a layer of acrylic paint, it will initially feel slightly sticky or tacky. During this phase, it's important not to touch or blend the paint as it could smudge or create unintended effects.
-
Surface Dry: As time passes, the surface of the paint will start to dry and lose its stickiness. However, keep in mind that even though it may appear dry on the surface, the layers underneath might still be wet.
-
Touch Dry: At this stage, the paint will no longer feel sticky when lightly touched. However, caution is still advised as there might be areas that are not completely dry.
-
Complete Dryness: Finally, after sufficient drying time has passed (which can vary depending on factors like humidity and thickness of layers), your acrylic painting will reach complete dryness. This means all layers are thoroughly dried and ready for further work or varnishing.
To prevent smudging or blending unintendedly between layers, make sure each layer has enough time to dry before applying another one. If you're in a hurry or want faster drying times, you can use a hairdryer on a low heat setting while keeping a safe distance from your artwork.
Protecting Your Finished Work
Once your acrylic painting is completely dry, it's crucial to protect it from dust, UV rays, and moisture damage by applying a sealant or varnish. Here are some key points to consider:
-
Varnish Application: Applying a varnish layer not only protects your painting but also enhances its appearance by providing a protective coating and increasing color vibrancy. Make sure to follow the manufacturer's instructions for the specific varnish you're using.
-
Choosing the Right Finish: Varnishes come in different finishes, such as matte, satin, or glossy. The choice of finish depends on personal preference and the desired effect you want to achieve with your artwork.
-
Dust and UV Protection: A varnish layer acts as a barrier against dust particles settling on your painting's surface, making it easier to clean and maintain.
Conclusion
And there you have it! Painting a realistic pine tree with acrylics is all about understanding the techniques and taking the time to layer and detail your artwork. By following the steps outlined in this article, you'll be able to create a stunning pine tree painting that captures the beauty of nature.
Now it's your turn to pick up that paintbrush and give it a try! Don't be afraid to experiment and add your own personal touch to the process. Remember, practice makes perfect, so keep painting and refining your skills.
So go ahead, unleash your inner artist, and create a masterpiece that showcases the majestic beauty of a pine tree. Happy painting!
FAQs
How do I start painting a pine tree with acrylics?
To start painting a pine tree with acrylics, begin by sketching the basic outline of the tree using a light pencil. Then, use a flat brush to apply different shades of green paint to create the foliage. Add details like branches and texture using smaller brushes. Experiment with layering and blending techniques to achieve depth and dimension.
What colors should I use to paint a realistic pine tree?
To paint a realistic pine tree, you'll need various shades of green for the foliage. Start with a base color like sap green or olive green, then mix in darker greens for shadows and lighter greens for highlights. You can also add touches of brown or gray for added realism and depth.
How can I create texture on the pine tree?
To create texture on your painted pine tree, try using techniques like dry brushing or stippling. With dry brushing, load your brush with a small amount of paint and lightly drag it across the canvas to mimic the texture of needles or bark. Stippling involves dabbing your brush onto the canvas to create small dots that resemble foliage or rough bark.
Can I use other types of brushes besides flat brushes?
Absolutely! While flat brushes are commonly used for painting pine trees, you can experiment with different brush shapes to achieve unique effects. Round brushes can be great for adding fine details or creating smoother transitions between colors, while fan brushes can help you achieve more natural-looking foliage textures.
How do I add highlights and shadows to my painted pine tree?
To add highlights and shadows to your painted pine tree, consider the direction of your light source. Use lighter shades of green mixed with white for highlighting areas that catch more light, such as the top portions of branches or edges of foliage clusters. For shadows, mix darker greens or grays into your base color and apply them in areas where less light reaches, such as the undersides of branches or deeper within the foliage.
Image Source: Paid image from CANVA