Ready to expand your orchid collection? Learning how to propagate orchids from cuttings is a rewarding and cost-effective way for growers to produce beautiful blooms. With the right techniques, you can create new mature orchids from existing ones, multiplying your stunning monopodial and sympodial orchid displays. This ancient practice has been passed down through generations, making it an essential skill for any orchid enthusiast.
Key Takeaways
-
Propagating orchids from cuttings can be an effective way to expand your orchid collection using different propagation methods and create new plants.
-
Understanding the specific propagation methods, such as stem cuttings, division, and aerial root propagation, is essential for successful orchid propagation.
-
Proper preparation, including selecting healthy parent plants and providing the right environment, is crucial for successful orchid propagation.
-
When propagating orchids, it's important to carefully care for the new plants, ensuring they receive the appropriate light, humidity, and nutrients.
-
Troubleshooting common issues during orchid propagation, such as rot or wilting, can help ensure the success of the process.
-
By following these actionable insights and understanding the different propagation methods, orchid enthusiasts can confidently propagate their orchids from cuttings, back bulbs, and expand their collection.
Understanding Orchid Propagation
Propagation Basics
Orchid propagation involves creating new plants from existing ones. It's a cost-effective way to expand your orchid collection. Understanding the basics is crucial for successful propagation.
Propagating orchids allows you to create more plants without having to purchase them, saving money and increasing the variety in your collection. By learning about the different methods of propagation, you can ensure that your new orchids thrive in their environment.
Best Time for Propagation
Spring and early summer are ideal for orchid propagation. Choose a time when the plant is actively growing, as this will increase the chances of success. Avoid propagating monopodial orchid during dormancy periods when the plant is not actively growing or flowering.
During spring and early summer, orchids are usually in their growth phase, making it an optimal time for taking cuttings and starting new plants. This period provides favorable conditions for root development and overall growth, giving your propagated orchids the best chance at thriving in a pot.
Selecting Cuttings
When selecting cuttings for propagating orchids, look for healthy, disease-free stems with no signs of damage or decay. Opt for mature orchid cuttings, non-flowering stems with at least three nodes - these sections have higher chances of developing roots successfully.
Ensuring that the orchid cuttings have a green, plump appearance indicates their health and potential for successful rooting. Healthy stem orchid cuttings provide a strong foundation for new growth and minimize the risk of failure during propagation efforts.
Orchid Types and Methods
Different orchid types may require specific propagation methods due to variations in their growth patterns or structures. Researching the best approach tailored to your particular orchid variety ensures better success rates in propagating them effectively.
Common methods for propagating orchids include stem cuttings, division, back bulbs, or even tissue culture techniques depending on species-specific requirements.
Preparing for Propagation
There are several essential steps to prepare before starting the propagation process. First, gather clean and sharp scissors or pruning shears for taking the cuttings. Prepare pots with a well-draining medium such as sphagnum moss or bark mix. Finally, have rooting hormone powder on hand to encourage root growth in the new cuttings.
Removing orchids from the parent plant is a crucial step in successful propagation. Carefully select the stem you wish to propagate and use sterile tools to make clean cuts while removing it from the parent plant. It's important to handle the orchid with care during this process to avoid causing unnecessary stress that could hinder its ability to grow roots after being removed.
Examining the health of the parent plant is vital before taking any cuttings for propagation. Check thoroughly for signs of pests or diseases that could potentially affect both the parent plant and any new cuttings taken from it. Ensuring that the parent plant is in optimal health will significantly increase your chances of success when propagating orchids through cuttings.
Propagating from Stem Cuttings
Cutting Selection
When propagating orchids from cuttings, it's crucial to select a section of the stem that is pristine, without any blemishes or damage. Look for a cutting with at least one healthy leaf node present, as this will aid in the development of new roots. Aim for a cutting that is around 4 to 6 inches long; this length provides enough space for root and shoot development.
Another essential aspect when choosing cuttings is to ensure they are taken from the mother plant's main stem or flower stem. This ensures that you're getting the healthiest and most viable sections for propagation. By selecting these offshoots, you're essentially guaranteeing successful growth due to their proximity to the parent plant's existing root system.
Rooting Process
After obtaining suitable cuttings, place them in a warm and humid environment conducive to encouraging root development. It's vital to monitor the cuttings regularly for signs of new root growth, which can take several weeks before becoming visible. Be patient during this process, as good things often take time; rushing could harm rather than help your cuttings' chances of survival.
During this period, keep an eye out for new growth emerging from nodes on the stems. This indicates that your efforts have been successful thus far and should be celebrated! The appearance of these small green shoots signifies progress towards establishing strong roots and future blooms.
Potting Cuttings
Once your cutting has developed robust roots, it’s time to pot them in individual containers using well-draining medium suited specifically for orchids. Ensure that each newly potted cutting receives adequate moisture without being overwatered—maintain a delicate balance here!
Remember how we mentioned monitoring nodes earlier? Well, now those very same nodes come into play once again! Keep an eye out for new growth emanating from these areas post-potting—the emergence of fresh leaves signifies healthy establishment within their new environment.
Division of Sympodial Orchids
Another method is the division of sympodial orchids. This technique involves identifying natural separations or offshoots within the orchid's root system. These divisions should have their own set of roots and leaves for successful propagation.
To start, carefully identify natural separations or offshoots within the sympodial orchid's root system. Once identified, gently separate these divisions from the parent plant using caution to avoid damaging their delicate structures. It's crucial that each division has a sufficient number of roots and healthy leaves to thrive independently.
After separating the divisions, it's time to pot them individually. Each division should be planted in its own pot with a suitable potting medium, ensuring that there is enough space for growth and development. By providing adequate space, you are allowing each division to establish itself as an independent plant.
Once potted, remember to water lightly and provide appropriate environmental conditions for each individual division. This includes maintaining optimal humidity levels and providing sufficient light without exposing them to direct sunlight that could cause damage.
Back Bulb Propagation
Back bulb propagation is a viable method. Look for plump and firm back bulbs with signs of new growth or viable eyes for successful propagation. Use sterile tools to detach back bulbs from the parent plant if necessary.
Utilize notching technique on certain orchid varieties to encourage keiki production. Make small incisions on specific areas of the stem to stimulate keiki growth, ensuring proper techniques are followed to avoid harming the parent plant.
Potting and moisture play crucial roles in successfully propagating orchids from back bulbs. Ensure proper potting medium and adequate moisture levels for optimal growth and development of propagated orchids.
Recognizing keikis is essential in the process of propagating orchids from cuttings. Keikis are small offshoots that can be produced through notching technique, serving as new plants for further propagation or as additional features on existing plants.
Keiki Propagation Method
Recognizing Keikis
Keikis are small plantlets that develop on the nodes of orchid spikes. They resemble miniature versions of the parent plant and usually have roots and leaves. To recognize keikis, look for tiny growths along the flower spike or at the base of the mother plant.
When identifying keikis, pay attention to their size, as they can vary depending on the orchid species. Observe any signs of new root development or leaf growth to confirm that it is indeed a keiki.
Keep in mind that not all orchids produce keikis, so it's essential to identify if your specific type of orchid is capable of this propagation method.
Separation and Planting
Once you've identified a keiki on your orchid plant, you can proceed with separating it from the mother plant for propagation. Use a clean cutting tool to carefully remove the keiki from its attachment point on the flower spike or at the base of the parent plant.
After separating, prepare a suitable growing medium such as sphagnum moss or an orchid potting mix with good drainage. Gently place the keiki into its new container, ensuring that its roots are well-covered with growing medium but not buried too deeply.
When planting keikis, maintain optimal humidity levels by covering them with clear plastic domes or placing them in a humid environment. This helps promote successful root establishment and overall growth.
Remember to water your newly planted keikis regularly while avoiding overwatering which may lead to rotting. Over time, as they establish themselves in their new environment, you'll notice new leaf and root growth indicating successful propagation through this method.
Aerial Root Propagation
Identifying Aerial Roots
Aerial roots are the key to propagating orchids through cuttings. These roots grow above the ground, usually from the stem or nodes of the plant. They appear as light-colored, spongy extensions that protrude from the stems or nodes of the orchid.
When identifying aerial roots, look for those that are healthy and plump. Avoid using any aerial roots that appear dry, shriveled, or damaged in any way. Healthy aerial roots have a greenish tinge and feel firm to the touch.
It's important to note that not all types of orchids produce aerial roots, so it's essential to identify this specific characteristic before attempting propagation through this method.
Trimming and Planting
Once you've identified suitable aerial roots, it's time to prepare them for planting. Start by carefully trimming these selected aerial roots from the parent plant using a clean and sharp pair of scissors or pruning shears.
After trimming, ensure each cutting has at least one node attached to it. This is crucial because nodes contain dormant buds which will eventually develop into new shoots and leaves once planted.
Next, prepare a suitable growing medium such as sphagnum moss or orchid bark mix for planting your cuttings. Gently press each trimmed aerial root into the chosen medium while ensuring they remain upright and stable.
Remember to keep your newly planted cuttings in a warm environment with indirect sunlight and maintain consistent moisture levels without overwatering them.
Caring for New Orchid Plants
Light and Humidity
New orchids require proper care to thrive in their new environment.It's crucial to provide the right conditions for these delicate plants. Place your new orchid in a location where it can receive bright, indirect light. Avoid direct sunlight as it can scorch the leaves of the baby orchid.
To maintain adequate humidity levels, consider using a humidifier or placing a tray filled with water and pebbles near the plant. This will help create a more humid microclimate around the mature orchid plant, mimicking its natural habitat. Misting the leaves occasionally can also contribute to maintaining optimal humidity levels for your new flowers.
Watering Techniques
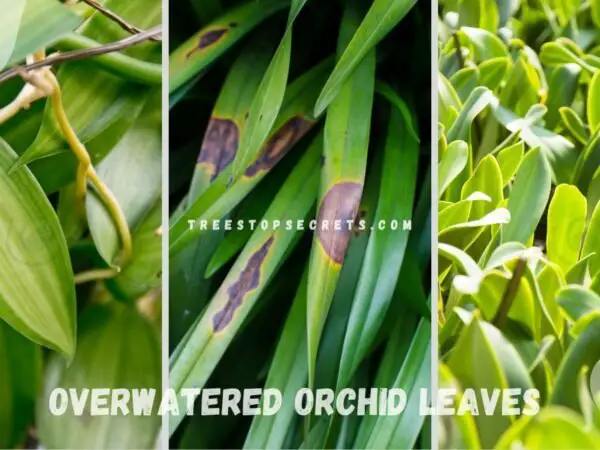
Proper watering techniques are essential for nurturing healthy orchids. When caring for new orchids, avoid overwatering as this can lead to root rot and other issues that may harm your plant's growth. Instead, water your baby orchid sparingly, allowing the top layer of soil to dry out between watering sessions.
One effective method is to immerse the pot in water until bubbles stop rising, indicating that the roots have absorbed enough moisture. Then allow excess water to drain completely before returning the pot to its original location. By following these careful watering practices, you'll ensure that your new flowers receive just the right amount of hydration without risking damage from overwatering.
Temperature Conditions
Maintaining suitable temperature conditions is vital for promoting robust growth in newly propagated orchids. These plants thrive in warm temperatures during the day but benefit from slightly cooler nights similar to their natural habitat environments. Ensure that your baby orchid is kept away from drafts or sudden temperature fluctuations which could stress or damage them.
Troubleshooting Common Issues
Mistakes to Avoid
When propagating orchids from cuttings, it's crucial to avoid some common mistakes that could hinder the process. One of the most critical mistakes is using a cutting with insufficient nodes. Without at least one node, which is where new growth develops, the cutting won't be able to produce roots or new shoots.
Another mistake to avoid is placing the cuttings in direct sunlight. Exposing them to direct sunlight can cause them to dry out too quickly and fail to develop roots properly. Overwatering can lead to rotting of the cuttings before they have a chance to establish themselves.
Furthermore, using dirty or contaminated tools for taking and handling orchid cuttings should be avoided at all costs. This can introduce harmful bacteria or fungi that may infect the delicate tissues of the plant and impede successful propagation.
Lastly, neglecting hygiene when handling orchid cuttings can also lead to issues during propagation. It's important always to wash your hands thoroughly and use clean gloves when working with your plants.
Signs of Poor Health
Recognizing signs of poor health in propagated orchids is essential for ensuring their successful establishment and growth. One key sign of poor health is yellowing leaves, which could indicate overwatering or inadequate light exposure.
Another indicator of poor health in propagated orchids is stunted growth or lack of new shoot development. This could stem from insufficient nutrients in the growing medium or incorrect environmental conditions such as inadequate humidity levels.
Moreover, if you notice black spots on the leaves or stems of your propagated orchids, it might signal a fungal infection due to excessive moisture around the plant tissues.
Final Remarks
Congratulations on reaching the end of this orchid propagation journey! You've learned various methods to propagate orchids, from stem cuttings to keiki propagation. Now, armed with this knowledge, you can confidently expand your orchid collection and share your beautiful plants with friends and family. Remember, patience is key when propagating orchids, so don't get discouraged if you don't see immediate results. Keep experimenting and nurturing your new orchid plants, and soon you'll be surrounded by a stunning array of flourishing blooms.
As you embark on your orchid propagation endeavors, don't forget to document your progress and share your experiences with other plant enthusiasts. Join online forums or local gardening clubs to exchange tips and tricks. Your journey doesn't end here; it's just the beginning of an exciting adventure in the world of orchids!
Frequently Asked Questions
How do I propagate orchids from stem cuttings?
To propagate orchids from stem cuttings, select a healthy, mature stem with at least three nodes. Cut the stem just below a node and place it in a suitable growing medium. Keep the medium moist and provide indirect light until new growth appears.
What is back bulb propagation for orchids?
Back bulb propagation involves separating and replanting older pseudobulbs from an established orchid plant. These bulbs may not be flowering but can produce new shoots and roots if provided with appropriate care and conditions.
Can I use aerial root propagation to grow new orchid plants?
Yes, you can use aerial root propagation to grow new orchid plants. Simply allow the aerial roots of your existing plant to extend into a suitable growing medium, such as sphagnum moss or bark mix. Once these roots establish themselves, they can develop into new plants.
How should I care for newly propagated orchid plants?
After propagating your orchids, ensure they receive adequate moisture without becoming waterlogged. Provide them with indirect sunlight and maintain warm temperatures (around 70-80°F). Avoid disturbing the newly propagated plants to encourage successful establishment.
What are some common issues when propagating orchids from cuttings?
Common issues when propagating orchids include rot due to excessive moisture or poor air circulation, inadequate rooting due to incorrect humidity levels or temperature fluctuations, as well as unsuccessful growth due to insufficient nutrients in the growing medium.
Image Source: Paid image from CANVA