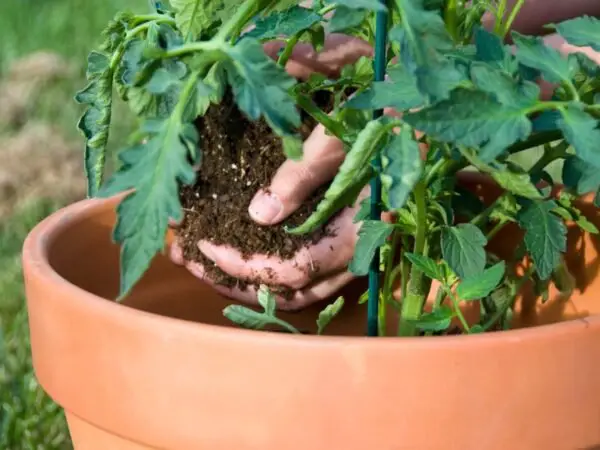
Repotting young tomato plants from seeds into peat pots is a crucial step in ensuring the healthy growth and development of the transplants. By repotting, you provide the necessary space and support for the adventitious roots to flourish, leading to stronger and more robust plants. Transplanting them into peat pots will ensure the seed leaves have enough room to grow.
Throughout this article, we will cover various aspects of repotting young tomato plants, including when to transplant them into larger containers, the right size of peat pots to choose, step-by-step instructions on how to effectively repot with minimal disruption to the root ball, and potential challenges you may encounter along the way. Whether you're a beginner or an experienced gardener looking for guidance on when to transplant your young tomato plants, this article has got you covered.
So let's dive in and discover how transplanting, or repotting, can make a significant difference in the quality and success of your tomato plants! Whether you're moving them from seed leaves to a larger pot or transferring them to the garden, this process is crucial. Don't forget to reply with any questions or comments, and image credit goes to our talented photographer.
Signs It's Time to Repot
True Leaves Emergence
The emergence of true leaves is a crucial milestone in the growth of a seed. It signifies progress and development. True leaves are the second set of leaves that appear after the initial cotyledons. They are important for the growth and development of the plant. These true leaves differ from cotyledons in both appearance and function. In reply to these differences, it is important to note that true leaves have distinct characteristics and purposes. While cotyledons are small and often round or oval-shaped, true leaves resemble the mature leaves of a tomato plant. In response to this observation, it is important to note that the shape and size of cotyledons differ from true leaves.
The appearance of true leaves indicates that the seedling has developed a strong root system and is ready for repotting. When you reply to this sign, it's time to transfer the seedling to a new pot. The presence of these leaves signifies that the seedling has transitioned from relying solely on stored nutrients to performing photosynthesis. This means that it can now absorb energy from sunlight and convert it into food for further growth.
Root Crowding Indicators
As your tomato seedling continues to grow, its roots will start to outgrow the current pot they are in. When this happens, you may notice signs of root crowding, which indicate that it's time for repotting. Stunted growth and yellowing leaves are common indicators of root crowding.
When roots become crowded in a small pot, they struggle to access sufficient water and nutrients, leading to poor growth and nutrient deficiencies. Addressing root crowding promptly is essential to prevent further damage to your seedling's health. By repotting into a larger container with fresh soil, you provide ample space for the roots to spread out and access necessary resources.
Seedling Height and Stability
The height and stability of your tomato seedlings can also serve as indicators that repotting is necessary. Factors such as light availability and pot size can influence their height and stability. Insufficient light can cause them to stretch or become leggy in search of more light, resulting in weak stems.
If your seedlings have grown tall or leggy, it's important to support them properly during repotting. Gently bury the stem deeper into the soil, ensuring that only the top leaves are above the surface. This technique promotes stability and prevents the seedlings from toppling over.
To further enhance stability, you can also consider using stakes or small trellises to provide additional support for your growing seedlings. These structures help prevent bending or breaking of stems, especially when they start bearing fruit.
Preparing for Repotting
Supplies Checklist
Before you embark on the repotting journey for your tomato seedlings, it's crucial to ensure you have all the necessary supplies at hand. Here's a checklist to help you get organized:
-
Pots: Make sure you have enough pots that are suitable in size for your tomato seedlings. It's ideal to choose pots that provide ample space for root development without being excessively large.
-
Potting Mix: Invest in high-quality potting mix that is well-draining and nutrient-rich. This will provide an optimal growing environment for your tomato plants.
-
Labels: Don't forget to label each pot with the variety of tomato seedling it contains. This will help you keep track of different varieties as they grow.
-
Optional Tools: While not essential, certain tools can make the repotting process easier. Consider using a dibber or transplanting trowel to carefully transfer the seedlings into their new pots.
It's vital to have all these supplies prepared before you start repotting your tomato seedlings. This way, you won't find yourself scrambling halfway through the process, searching for missing items.
Pot Selection Criteria
Choosing the right pot size is a critical factor. Here are some key considerations:
-
Root Development: Ensure that the chosen pot provides enough room for healthy root growth. A cramped space can hinder root expansion and lead to stunted plant growth.
-
Size Balance: Strive for a balance between providing sufficient space and avoiding excessively large pots. Too much soil volume can hold excess moisture, potentially causing root rot or other water-related issues.
-
Material Matters: Consider the material of the pot based on specific needs. Plastic pots are lightweight and retain moisture better, while terracotta pots are porous and allow better airflow.
By assessing these factors, you can select the most suitable pot size for your tomato seedlings during the repotting process. This will promote healthy growth and ensure optimal conditions for your plants.
Remember, when repotting tomato seedlings, it's crucial to have all the necessary supplies ready beforehand. Consider the pot size carefully, balancing root development and container volume. By taking these steps, you'll set yourself up for success in nurturing thriving tomato plants!
Separating Tomato Seedlings
One of the crucial steps is separating them from their current pots. This process requires gentle extraction techniques to minimize any damage and ensure the continued growth and health of the plants.
Gentle Extraction Techniques
To remove tomato seedlings without causing harm, there are a few methods you can employ. First, it's essential to loosen the soil around the roots with minimal disturbance. Gently insert a small tool, such as a spoon or your fingers, into the soil near the edges of the pot. Slowly work your way around, loosening the soil and creating space for extraction.
Proper handling techniques are crucial during this process to avoid breaking stems or damaging delicate roots. Hold the seedling by its leaves rather than pulling on the stem, as this can cause injury. By gently grasping the leaves close to where they meet the stem, you provide support while minimizing stress on fragile plant tissues.
Minimizing Root Damage
Minimizing root damage during repotting is vital for promoting healthy growth in tomato plants. When separating seedlings, take care not to tear or break their delicate roots. Untangling root systems gently allows for optimal growth potential.
To handle fragile root systems without causing harm, it's helpful to soak the potting mix before repotting. Moistened soil will be less likely to cling tightly to roots when removing them from their original containers. This moisture also helps keep root hairs intact during extraction.
When transplanting tomato seedlings with intertwined roots, use your fingers or a small tool like a toothpick to carefully separate them. Take your time and work patiently through each tangle until all individual roots are free from entanglement.
Remember that damaged roots can hinder nutrient uptake and water absorption in plants. By taking extra precautions during separation, you give your tomato seedlings a better chance at thriving in their new pots.
Repotting Process Explained
Soil Preparation Steps
Before repotting tomato seedlings, it is crucial to prepare the soil properly. Start by creating a suitable potting mix that has good drainage and nutrient content. This will provide a healthy environment for your seedlings to grow. You can achieve this by combining equal parts of garden soil, peat moss, and perlite or vermiculite.
To enhance the fertility of the soil, add organic matter or compost. This will enrich the soil with essential nutrients that promote robust growth in your tomato plants. Mix in about one-third to one-half part of organic matter or compost into the potting mix.
Another important aspect of soil preparation is ensuring proper moisture levels in the potting mix before repotting. The soil should be slightly moist but not overly wet or dry. This will help prevent transplant shock and allow the roots to establish themselves quickly in their new container.
Planting Depth Determination
Determining the correct planting depth when repotting tomato seedlings is vital for their successful growth. As a general guideline, bury the stem deeper than it was originally planted in its previous container. By doing so, you encourage the development of additional roots along the buried portion of the stem.
Burying the stem deeper provides several benefits for your tomato plants. Firstly, it helps anchor them securely in their new container, preventing them from becoming top-heavy and falling over as they grow taller. Secondly, burying more stem allows more roots to develop, which improves nutrient uptake and overall plant health.
However, it's important not to bury the stem excessively deep as this can lead to stem rot or hinder growth. Only bury up to two-thirds of the length of the seedling's stem while ensuring that at least a few leaves are still above ground level.
Remember that different types of tomatoes may have specific recommendations regarding planting depth based on their growth habits. Consult the seed packet or plant label for any specific instructions related to your tomato variety.
Acclimatization After Repotting
After successfully repotting your tomato seedlings, it's crucial to ensure they acclimate properly to their new environment. This process involves gradually exposing them to increased light intensity and adjusting temperature conditions. Let's explore these important steps in more detail.
Gradual Light Exposure
A sudden change can be detrimental to the health of your tomato seedlings. It's essential to acclimate them gradually to prevent sunburn or shock. Begin by placing the repotted seedlings in an area with indirect sunlight for a few hours each day. This controlled exposure allows them to adjust without being overwhelmed by intense sunlight.
Over the course of several days, increase the duration and intensity of direct sunlight exposure. Start by giving them just a couple of hours of direct sunlight in the morning or late afternoon when the sun is less intense. As they become more accustomed, you can extend their exposure time and move them into full sun conditions.
By taking this gradual approach, you're giving your tomato seedlings time to adapt and develop stronger leaves that can handle higher light intensities. It also reduces the risk of sunburn or wilting that could occur if they were suddenly exposed to full sunlight.
Temperature Adjustment Techniques
Temperature plays a vital role in the growth and development of tomato seedlings after repotting. Sudden changes in temperature can stress or even damage young plants, so it's essential to implement proper adjustment techniques.
One important aspect is ventilation. Ensure that your repotted seedlings have adequate airflow around them without being subjected to strong drafts that may cause temperature fluctuations. Good air circulation helps maintain optimal temperatures and prevents excessive heat buildup around the plants.
Controlling the ambient temperature is crucial for healthy growth. If you're growing tomatoes indoors, make sure they are kept at an optimal temperature range between 65°F (18°C) and 75°F (24°C). Avoid placing them near cold drafts or heat sources that could lead to sudden temperature changes.
When transitioning your seedlings from indoor conditions to an outdoor environment, it's important to consider the outside temperature as well. If there is a significant difference between the indoor and outdoor temperatures, gradually expose your plants to the cooler outdoor conditions over several days. This gradual adjustment helps them acclimate without experiencing shock or stress.
Post-Repotting Care
Watering Best Practices
After repotting your tomato seedlings, it's crucial to ensure they receive proper watering. Follow these guidelines to keep them hydrated and thriving:
- Effective Watering: Provide sufficient moisture without overwatering. Striking the right balance is key. Aim to keep the soil consistently moist but not waterlogged.
- Deep Root Development: Encourage deep root growth by employing specific watering techniques. Instead of lightly sprinkling the soil surface, water deeply at the base of the plant. This method allows the roots to reach down into the soil, promoting a stronger and more resilient plant.
- Watering Frequency: Monitor your tomato seedlings closely and adjust the watering frequency accordingly. Factors such as temperature, humidity levels, and pot size can influence how quickly the soil dries out. As a general rule, check the top inch of soil regularly; if it feels dry to the touch, it's time to water.
- Consistent Moisture: Consistency is key. Avoid allowing the soil to completely dry out between waterings as this can stress the plants and hinder their growth.
Organic Fertilization Schedule
Proper fertilization is essential for providing essential nutrients that support healthy growth in your tomato seedlings after repotting:
- Suggested Schedule: Establish a fertilization schedule based on your tomato seedlings' needs and growth rate post-repotting. Generally, begin applying organic fertilizer about two weeks after repotting and continue every two weeks thereafter until transplanting into their final growing location.
- Types of Organic Fertilizers: Choose organic fertilizers specifically formulated for vegetables or tomatoes to provide optimal nutrition for your plants' needs during this critical stage of development.
- Consider Plant Size: Adjust fertilizer application frequency based on the size of your tomato seedlings. Younger, smaller plants may require less fertilizer compared to larger, more established ones. Always follow the manufacturer's instructions regarding dosage and frequency to avoid over-fertilization.
- Manufacturer Instructions: Pay close attention to the recommended application rates and guidelines provided by the manufacturer of your chosen organic fertilizer. Following these instructions ensures that you provide the right amount of nutrients without risking damage to your tomato seedlings.
Remember,Aim for consistency and deep root development. Adhering to a proper organic fertilization schedule provides essential nutrients for healthy growth. By following these best practices, you'll give your tomato seedlings the care they need to thrive after repotting.
Second Repotting for Enhanced Growth
Timing and Reasons
Timing is crucial for their optimal growth. The ideal time to repot tomato seedlings is when they have developed their first set of true leaves and are about 2-3 inches tall. This indicates that the roots have started to grow and the seedling is ready for a larger container.
However, there may be situations where you need to repot tomato seedlings earlier or later than usual. Factors like weather conditions and plant health can influence the timing of repotting. For instance, if you notice that your seedlings are becoming root-bound or overcrowded in their current containers, it's best to repot them sooner rather than later. On the other hand, if the weather is still too cold or unpredictable, it might be better to wait until the conditions are more favorable before transplanting into larger pots.
Pot Upgrade Considerations
It's important to keep an eye out for indications that your tomato seedlings have outgrown their current pots. One telltale sign is when you see roots poking out from the bottom drainage holes or circling around inside the pot. This suggests that the roots are running out of space and need more room to grow.
When deciding whether to upgrade to a larger pot or transplant outdoors, consider factors such as the size of your seedling and its overall health. If your tomato plant has grown significantly in size and its roots are starting to fill up most of the existing pot, it's time for a pot upgrade. Providing more space for root development through pot upgrades allows your plants to access more nutrients and water from the soil, leading to healthier growth and higher yields.
Transplanting outdoors can also be an option if you have suitable garden beds or containers available. This allows your tomato plants to establish themselves directly in their final growing location without needing multiple pot upgrades. However, ensure that the weather conditions are favorable and that your seedlings have been hardened off properly before making this transition.
Transplanting to Final Locations
When to Move Seedlings Outdoors
Determining the right time to move your repotted tomato seedlings outdoors is crucial for their successful growth. Several factors should be considered when deciding on the appropriate timing. One of the most important considerations is the temperature. Tomato plants thrive in warm weather, so it's essential to wait until all danger of frost has passed before transplanting them outside.
Another factor to keep in mind is the hardening off process. This involves gradually acclimating your seedlings to outdoor conditions by exposing them to increasing amounts of sunlight and wind over a period of time. Hardening off helps toughen up the plants and prepares them for life outside the controlled environment of your home or greenhouse.
Prematurely exposing your tomato seedlings to harsh outdoor conditions can harm their delicate structure and stunt their growth. It's better to be patient and wait until they are strong enough to withstand any potential challenges that Mother Nature may throw at them.
Final Planting Depth and Spacing
Once your tomato seedlings have been repotted and are ready for their final planting locations, it's important to consider both planting depth and spacing. Proper planting depth ensures that your plants establish a strong root system, which is vital for their overall health and productivity.
When transplanting your tomato seedlings, bury them deep enough so that only a few sets of leaves are above the soil surface. This allows for additional roots to develop along the buried stem, resulting in a more robust plant.
Spacing between tomato plants is equally important as it allows for adequate airflow and prevents overcrowding. Each mature tomato plant requires sufficient room for its roots to expand and access nutrients from the soil. Crowded plants not only compete for resources but also increase the risk of diseases due to poor air circulation.
Maintaining proper spacing between plants also makes it easier for you to tend to each individual plant, such as pruning, staking, and harvesting. It's recommended to leave at least 18-24 inches of space between each tomato plant to ensure optimal growth and productivity.
Common Mistakes to Avoid

Early Transplanting Consequences
Transplanting tomato seedlings too early in their growth cycle can have detrimental consequences. When you rush the process and move them before they are strong enough, you risk stunted growth, shock, or increased susceptibility to pests and diseases. Just like a baby bird that needs time in the nest before taking flight, tomato seedlings require patience and nurturing until they are ready to be transplanted.
Overcrowding Complications
Allowing tomato seedlings to become overcrowded in pots can lead to a host of challenges. When there is limited space, these young plants must compete for resources such as sunlight, water, and nutrients. This competition for essential elements can result in stunted growth or nutrient deficiencies. To avoid this predicament, it's crucial to repot or thin out excess seedlings in a timely manner.
Imagine a crowded party where everyone is vying for attention - it becomes difficult for anyone to thrive or stand out. Similarly, when tomato seedlings are crammed together in a small pot, they struggle to access the vital resources they need for healthy development. By repotting or thinning them out when necessary, you create an environment where each plant has ample room to grow and flourish.
Repotting provides your tomato seedlings with the opportunity to spread their roots and establish stronger foundations. It allows them access to more soil volume and nutrients while reducing competition among neighboring plants. Think of it as moving from a cramped apartment into a spacious house - more room means more comfort and better chances of success.
Repotting also helps prevent the risk of root-bound plants. When left too long in small containers without sufficient space for root expansion, the roots become tangled and compacted. This restricts their ability to absorb water and nutrients effectively, leading to poor overall plant health.
By repotting your tomato seedlings at the right time, you give them the best chance to thrive and produce an abundant harvest. It's important to monitor their growth and look for signs that they have outgrown their current containers. These signs include roots poking out of drainage holes, slowed growth, or yellowing leaves.
Remember, successful gardening is all about providing the optimal conditions for your plants to flourish. Avoid the common mistakes of early transplanting and overcrowding by giving your tomato seedlings the space and time they need to grow strong. By doing so, you'll set them up for success in their journey from tiny seeds to bountiful tomatoes.
Conclusion
Congratulations! You are now equipped with the knowledge and skills to successfully repot your tomato seedlings. By recognizing the signs that it's time to repot, preparing for the process, and understanding the steps involved, you can ensure the healthy growth of your plants. Remember to give them proper care and acclimatize them after repotting.
Now it's time to put your newfound expertise into action. Roll up your sleeves, grab your gardening tools, and get ready to give your tomato seedlings the best chance at thriving. By following the steps outlined in this article, you'll be well on your way to a bountiful harvest of delicious tomatoes.
So go ahead, enjoy the satisfaction of nurturing your plants from seedlings to mature plants. Happy gardening!
FAQs
When is the best time to repot tomato seedlings?
The best time to repot tomato seedlings is when they have grown their first set of true leaves and are about 3-4 inches tall. This usually happens around 4-6 weeks after germination. Repotting at this stage ensures that the seedlings have developed a strong root system and can handle the transplanting process.
How do I know if my tomato seedlings need to be repotted?
If your tomato seedlings appear crowded in their current container, with roots poking out of the drainage holes or circling around the bottom, it's a sign that they need more space and should be repotted. If they are growing slowly or showing signs of nutrient deficiency, it may be time for a larger pot.
What type of container should I use for repotting tomato seedlings?
Choose a container that is at least 4-6 inches deep and has drainage holes to prevent waterlogging. Opt for pots made of plastic or terracotta, as they provide good airflow and allow excess moisture to evaporate. Avoid containers that are too large, as excessive soil volume can lead to overwatering and hinder root development.
How should I prepare the new pot before repotting my tomato seedlings?
Before transferring your tomato seedlings into a new pot, ensure it is clean and free from any pathogens by washing it with mild soap and warm water. Rinse thoroughly to remove any soap residue. Fill the new pot with well-draining potting mix, leaving enough space at the top for watering.
Do I need to harden off my tomato seedlings after repotting?
Yes, it's crucial to harden off your tomato seedlings after repotting them. Gradually expose them to outdoor conditions by placing them in a sheltered area for short periods initially, then gradually increasing the time and intensity of exposure over a week or two. This helps them acclimate to the sun, wind, and temperature changes.
Image Source: Paid image from CANVA