Growing an avocado plant from a seed can be a fun and rewarding experience, but it’s essential to start the right way. One of the most common questions is, “Which end of the avocado seed goes in water?” Getting this simple step wrong could hinder the growth of your avocado tree. In this post, we’ll guide you through the correct way to position your seed for successful sprouting and growth.
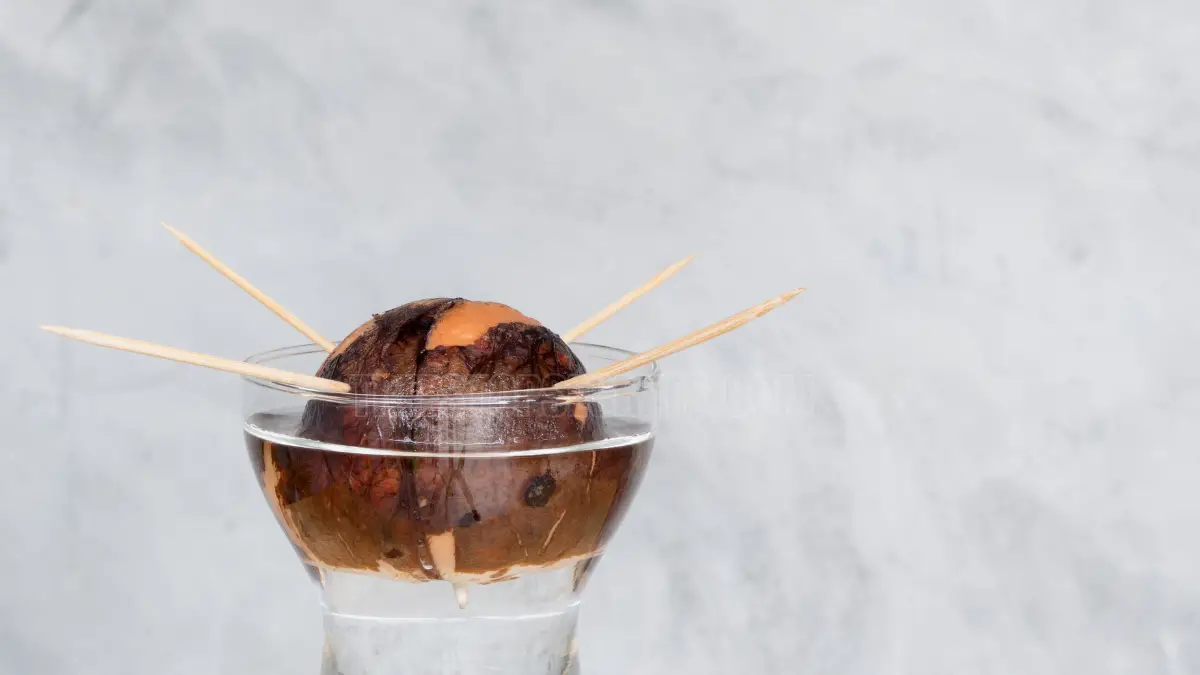
The broader, flat end of the avocado seed is the part that should go in water. This end contains the root system and needs to be submerged for the seed to start sprouting. The pointier end of the seed should remain above water, as this will develop into the stem of the avocado plant. Ensure the seed is balanced, with only about one-third submerged in water.
Are you eager to grow your own avocado tree? With the right care, you can start sprouting an avocado seed at home in just a few weeks! Follow along to learn the step-by-step process, and soon enough, you'll be nurturing a thriving avocado plant. Let’s make sure you avoid common mistakes and get the best results.
Planting Avocado Seeds
Growing an avocado from seed isn't just fun—it's super satisfying. Here's how I make sure my little green buddies take off without a hitch: it’s all about getting the seed’s position right and prepping it like a pro.
Getting the Seed in the Right Spot
So, positioning the seed is crucial. Like, really crucial. You want the flat, broad end of the seed pointing down into the water, and the pointy end sticking up. Why? Because roots will sprout from the flat end, and the stem will shoot up from the pointy part. Trust me, get this wrong, and you'll end up with a perplexed little seedling (Epic Gardening).
Prepping the Seed Like a Boss
Alright, here's my battle-tested method for prepping that avocado seed:
- Cleaning: First, you've got to remove it from the avocado and wash off all that clingy pulp. Keeps mold away.
- Soaking: Throw it in some warm water overnight. This little spa treatment loosens up any germination blockers and gets the seed ready to sprout (Home Made by Carmona).
- Peeling the Husk: Carefully peel off the outer skin. This helps the roots break free when they start to grow.
- Wrapping in a Damp Towel: Toss the seed into a damp paper towel, stick it in an airtight container, and store it somewhere warm and dark. Remember, keep that towel moist—check and change it weekly.
Here's a quick cheat sheet for the steps:
| Step | Description |
|---|---|
| Clean the Seed | Remove any leftover avocado pulp, wash it thoroughly. |
| Soak in Warm Water | Let it chill in warm water overnight to lift off germination inhibitors. |
| Peel the Outer Husk | Carefully remove the husk to free up root space. |
| Wrap in a Paper Towel | Keep it cozy in a damp paper towel, change it every week. |
By nailing these steps, I'm boosting the odds of sprouting a healthy avocado plant. Nothing feels better than watching that little green sprout pop out and start growing strong.
Avocado Growing Tricks
When I'm ready to grow my avocado babies, I've got some cool methods up my sleeve. Whether you want to use water, soil, or cuttings, each technique has its own charm. Pick whatever suits your style.
Water Germination
One of the funnest ways to kick things off is to germinate your avocado seed in water. Grab three toothpicks and stick them into the seed about halfway. The idea is to let the seed sit on the rim of a glass or jar filled with water. Make sure the fat, flat side of the seed is submerged—keep an eye on the water level, topping it up when it gets low.
| Step | Action |
|---|---|
| 1 | Stick three toothpicks into the seed halfway down. |
| 2 | Rest the seed on the rim of a water-filled glass. |
| 3 | Submerge the flat end, top up water as needed. |
Soil Planting
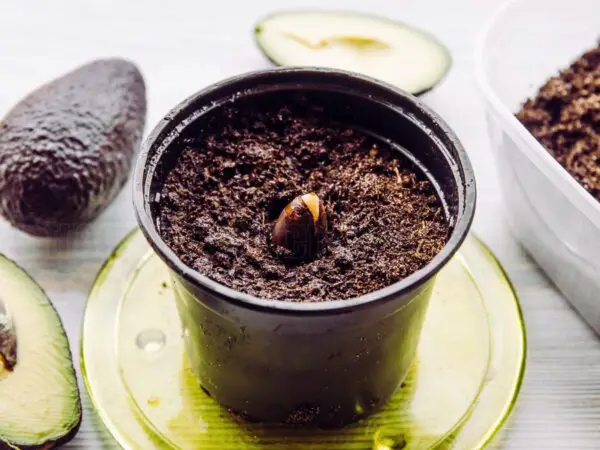
For those who like to get their hands dirty, planting directly into soil is another great option. Stick the seed in a pot with the flat end facing down and the pointy end up. This way, the seed settles directly into its new home (Epic Gardening).
| Step | Action |
|---|---|
| 1 | Fill a pot with potting soil. |
| 2 | Plant the seed flat side down, pointy end up. |
| 3 | Water well, but don't drown it. |
Cuttings Propagation
If you want a carbon copy of an existing avocado tree, cuttings are the way to go. It's best to do this in early spring when the tree's bursting with new growth. Snip a healthy piece from the parent tree and give it a boost with some rooting hormone before planting it in soil.
| Step | Action |
|---|---|
| 1 | Snip a cutting from a healthy tree. |
| 2 | Dab it with rooting hormone. |
| 3 | Plant it in a pot with some soil. |
So, whether you're team water, soil, or cutting, each method has its perks. Have fun experimenting and enjoy watching your avocado plant journey from seed to sprout.
Growing Avocados: Tips from My Backyard
Growing avocados isn't just a hobby—it's an adventure that rewards you with lush greenery and (hopefully) delicious fruit. Through some trial and error, I've picked up a few tips that can make a big difference.
When to Plant
Turns out, timing is everything. Plant your avocado trees in early spring. Why? Because it gives the trees a chance to settle in before the summer heat kicks in. Make sure they’re protected from strong winds and away from buildings since their roots like to spread out and can be a bit disruptive.
| Season | Best Planting Time? |
|---|---|
| Spring | Yes, plant away! |
| Summer | Nope, too stressful |
| Fall | Avoid it |
| Winter | Trees are sleeping, skip planting |
Perfect Growing Conditions
Avocados love a bit of warmth—think tropical vibes. No wonder the most avocados come from Mexico. These trees are thirsty, too. Each avocado needs about 20 gallons of water. At home, good drainage in the soil is key. I mix in perlite or sand to help with that.
| Climate | Water Needs |
|---|---|
| Warm/Tropical | Lots of water |
| Temperate | Moderate amounts |
Watering and Feeding
Avocado trees are a bit picky about water. They like their soil soaked, but don’t keep it soggy. Let it dry out a bit before watering again. And daily small waterings? That’s a no-go—it can cause root rot. Watch the leaves; they’re pretty good at showing if something’s off.
- Use room temperature distilled water.
- Keep the soil damp but not waterlogged.
- Leaves looking sad? Adjust watering.
Stick to these tips, and you're more likely to see your avocado dreams come true. Happy planting!
Avocado Seed Germination
Starting an avocado from seed can be a fun adventure! Here's a guide I swear by—straight to the point and easy to follow.
Cleaning and Soaking the Seed
First things first—clean that seed! Scrub off every bit of fruit flesh. Once it's squeaky clean, let the seed take a nice, cozy bath in warm water overnight. This soak primes it for growth by washing off germination blockers and adding the moisture it needs.
The Wet Paper Towel Trick
After its spa night, I sometimes go with the wet paper towel method. Just wrap the seed in a damp paper towel, pop it into an airtight plastic bag or container, and stash it in a warm, dark spot. Remember to keep it hydrated by changing the towel every week. This cozy setup encourages sprouting like a champ (source).
Moving the Seed into Water
When you see that first root poking out, it's time for a transfer. Carefully place the seed in a jar or glass with the wide end down, so the root dips into the water without fully submerging the seed. Use toothpicks or a jar rim to keep it steady. Heads up—this can take a while. Avocado seeds might sprout in days, or they might test your patience for months. Once the roots get cozy and fill up the container, prep a pot to move your budding plant into soil.
Step-by-Step Timeline
Here's a handy breakdown of the steps and how long each takes:
| Step | Action | Duration |
|---|---|---|
| Cleaning | Wash seed thoroughly | A few minutes |
| Soaking | Soak in warm water overnight | 12-24 hours |
| Paper Towel Propagation | Wrap in damp paper towel in a warm, dark place | Change weekly |
| Transferring to Water | Place root in water with broad end down | Upon visible root growth |
| Sprouting | Wait for seed to sprout | Days to months |
With a bit of patience and TLC, you'll have an avocado plant sprouting in no time. Enjoy the process and watch your green thumb grow!
Avocado Plant Care Tips
Taking care of your avocado plant after it’s sprouted is like raising a little green buddy. Here’s a no-nonsense guide to making sure your sprouted seed flourishes, from handling that first sprout to spotting signs it's doing well.
Handling the Sprouted Seed
When your avocado seed sprouts, you’ve got to be gentle. If you’ve been growing it in water, wait until the roots look strong and about 4-6 weeks old before moving it to soil. Pop it into a pot, but don't bury the seed completely. Keep a bit of it peeking above the soil so it can breathe easy and catch some light. If soil is your game from the start, make sure you toss some gravel or pebbles in the bottom of the pot for drainage. Avocados love their water but hate being waterlogged.
Keeping an Eye on Growth
Watching your little avocado plant grow is kinda like watching grass dry, but more rewarding! It’ll be around 8 weeks before you see proper roots and shoots. Here’s what to look out for to keep things on track:
| What to Watch | What's Normal |
|---|---|
| Leaf Color | Bright green leaves mean a happy plant. |
| Leaf Movement | Leaves falling off occasionally is normal, but if they’re wilting quick, something's up (Greg Alder). |
| Soil Moisture | Keep the soil soaked, but let it dry out a bit before watering again. |
Signs It’s Rooting and Sprouting
As you watch your avocado, there are clear signs it’s growing well:
- Roots: After a few weeks in water or soil, teeny roots will start to show. This means it’s ready for more space.
- Leaflets: When small leaves pop up, you know it’s getting stronger.
- Stem Strength: A firm stem is a good sign your plant’s establishing itself.
Keep the seedling in a warm spot with indirect sunlight. Watching it grow is pretty satisfying and lets you know you’re doing something right. Now go out there and grow those deliciously smooth, green goodies!
Keeping Your Avocado Plant Happy
Alright, let's get into the nitty-gritty of avocado plant care. Watching over my avocado plant has become a bit of an obsession, but hey, it's all worth it when I see those green beauties thriving.
When Your Leaves Go Yellow or Drop
Sometimes, I notice the leaves on my avocado tree turning yellow, usually signaling they're about to drop off. This yellowing typically starts in the veins and spreads out before the leaf finally takes the plunge (Greg Alder). Here's a cheat sheet for what's up with those leaves:
| Leaf Color Change | What's Going On |
|---|---|
| Yellowing from veins | The leaf's just getting old |
| Dark brown spots between veins | Cold weather giving the tree a hard time |
| Black, curly leaves | Frost got to it, especially the baby leaves |
Drooping leaves? That's my plant’s way of saying, "Hey, I need water!" Particularly in those blazing hot days. I jump on these signs quick to keep my avocado friend happy.
Battling Leaf Pests
Pests can be a real pain, right? I keep my eyes peeled for any signs of tiny intruders munching on my leaves. Sometimes, the leaves get all speckly, which usually means little critters like mites are having a feast. Look for scattered dots or even silvery webbing (Greg Alder). These signs scream pest invasion and need some immediate pest control TLC.
| Type of Damage | Clue |
|---|---|
| Speckled leaves | Mites having a snack |
| Silvery webbing | Spider mites hanging out |
| Bronzed spots | Cold's picked a fight with the tree |
Keeping the leaves clean and pest-free is my go-to strategy for a healthy avocado tree.
Health Check for My Avocado Tree
Monitoring my avocado plant’s health is like being its personal doctor. Healthy leaves are a gorgeous green, but if they start yellowing, drooping, or changing color, it's time to step in. Cold damage usually shows up as dark spots or curled leaves, which means I need to tweak its surroundings (Greg Alder). Here's my quick rundown:
| Health Clue | Potential Issue |
|---|---|
| Bright green leaves | Happy plant |
| Yellowing leaves | Could be getting old or missing some nutrients |
| Leaf drop | Normal aging or stressing out over something |
Being proactive means I can spot problems early and keep my avocado plant in top shape. It's all about those little signals; they tell me exactly what my plant needs to stay awesome.
Final Thoughts:
Which End of Avocado Seed Goes in Water? Knowing which end of the avocado seed to place in water is crucial for successful sprouting. By ensuring that the flat, broader end is submerged, you’ll set your seed up for healthy root growth. With patience and the right care, your avocado seed will transform into a thriving plant. Start your avocado-growing journey today!
FAQs about "Which End of Avocado Seed Goes in Water"
Q: Which end of an avocado seed should be submerged in water? A: The flat, broader end of the avocado seed should be submerged in water. This part will develop the roots, while the pointier end should stay above water for stem growth. Q: How long does it take for an avocado seed to sprout in water? A: On average, an avocado seed takes 2 to 6 weeks to sprout roots in water. Be patient and keep the water level consistent during this time. Q: How do you keep an avocado seed upright in water? A: Use toothpicks inserted into the seed’s sides to balance it on the rim of a glass. This will keep the seed’s bottom in water and the top above. Q: Should I change the water when sprouting an avocado seed? A: Yes, changing the water every 3 to 5 days prevents bacteria buildup and ensures the seed stays healthy while sprouting. Q: Can I grow an avocado tree from any seed? A: While most avocado seeds will sprout, it's best to use a fresh, undamaged seed from a ripe avocado for the highest chance of success.
Image Source: Paid image from CANVA


