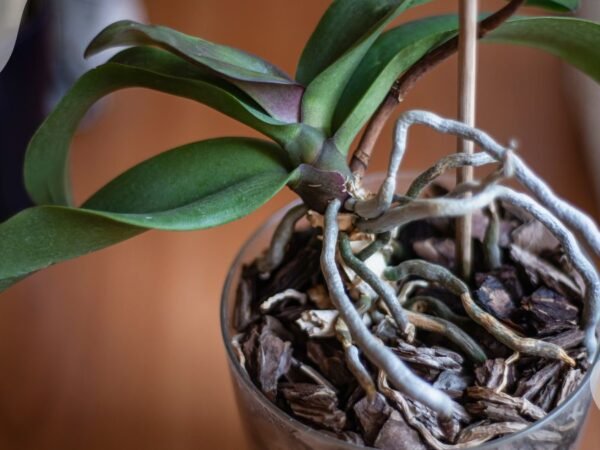
Ever wondered why your epiphyte orchids have rhizome roots growing in the air? Our plant specialist expert answer could be related to their natural habitat on tree branches. These aerial roots aren't a sign of rebellion, they're actually vital for your epiphyte orchids' survival. As a plant specialist expert answer would tell you, the rhizome on tree branches is crucial. Unlike the rhizome snug in the potting mix, these epiphyte orchids' air roots absorb moisture and nutrients directly from the environment during the repotting process, as per plant specialist expert answer.
Plant specialists agree that root tips and aerial roots are a big deal in maintaining your orchids healthy and vibrant, especially in the right humidity conditions. But what happens when your orchid potting mix seems to be bursting with roots? This is a common issue for orchid growers and often requires advice from a plant specialist for proper orchid care. It might be time for a repot! Understanding how to repot orchids, especially those with air roots, can seem like a daunting task. But don't worry - as a plant specialist, we've got you covered with the right container and humidity conditions. Prepare to explore the realm of orchids and their air roots with a plant specialist, understand their significance in botanical design, and master the art of repotting in different humidity conditions.
Gathering Materials for Successful Repotting
So, you've got your orchid, a fascinating plant specialist's delight, with air roots thriving in humidity, and it's time to give it a new home with an engaging botanical design. Let's talk about the essentials with a plant specialist: pots, soil mix for orchid roots, scissors for root tips, and care for base roots.
Essential Tools for Repotting
When repotting an orchid, considering its aerial roots and base roots, having the right botanical design tools at hand is crucial. You'll need a pot for your orchids, some soil mix suitable for orchid roots, and a pair of sharp scissors to trim aerial roots. Ensure adequate humidity for growth.
- A good pair of scissors is essential for trimming dead leaves or roots when maintaining orchids and preparing your orchid potting mix. It's important to consider the humidity and select the right medium.
- The medium for your orchids should be sturdy enough to hold the plant and its aerial roots, but not too large that it encourages overwatering of the orchid roots.
- As for the orchid pot soil mix, sphagnum moss or tree bark works wonders for orchids, aiding in the growth of aerial roots and healthy orchid roots.
Remember, these are just the basics. Feel free to add in any other materials like medium, pot, or aerial roots you think will help make the process of growing orchids smoother!
Sterilized Tools Prevent Disease Spread
Cleanliness isn't just next to godliness; it's also key in preventing disease spread among orchids, especially through their aerial roots and the pot medium.
- Sterilizing your tools before use can save your orchids, particularly their aerial roots, from potential harm in the medium.
- Simply soaking the aerial roots in a solution of water and bleach inside a medium pot will do the trick.
Just make sure the pot's medium and aerial roots are dry before you start using them!
Suitable Soil Types for Orchids
Orchids aren't picky eaters but they do have preferences when it comes to their medium and pot, with a special fondness for aerial roots.
- Sphagnum moss retains moisture well and provides good aeration.
- Tree bark, a common pot medium, allows excellent drainage while still retaining some moisture for aerial roots.
Both options, using aerial roots or a medium in a pot, mimic their natural habitat on tree branches so you can't go wrong with either!
Choosing the Right Pot Size
Last but not least, let's talk about pots. Size does matter here!
- Your new medium-sized pot should be just big enough to accommodate the rhizome (that's fancy plant talk for stem) and roots comfortably.
- If you go too big with the pot, you risk overwatering as the excess soil retains more water, potentially damaging the aerial roots.
- Too small a pot, and your orchid might feel cramped, its aerial roots unable to grow.
So, take a good look at your plant's aerial roots before you decide on a pot. It's all about finding that Goldilocks zone for your pot - not too big, not too small, but just right for the aerial roots!
Removing Orchid from Old Pot Safely
Orchids are a bit finicky, especially. We're going to discuss how to safely remove your orchid and its aerial roots from its old pot without causing any damage.
Gentle Techniques for Root Removal
First things first, you gotta be gentle. Orchids' roots are delicate and can easily get damaged if not handled with care in a pot. Imagine treating the orchid's aerial roots like a baby bird within its pot - that's how gentle you need to be.
- Use soft tools like a sponge or cloth instead of hard ones when handling your pot plants and aerial roots.
- Always support the plant, especially those with aerial roots, from the bottom while removing it from the pot.
Handling Stuck or Tangled Roots
Sometimes, orchid roots might get stuck or tangled in the old pot. Don't yank them out!
- Soak the aerial roots in water for some time which will soften them up in the pot.
- If the aerial roots are still stuck, use a sterilized knife or scissors to carefully cut them free.
Minimizing Plant Stress During Removal Process
Repotting can stress out your orchid big time. But there are ways to keep this stress minimum.
- Choose a day when the weather is mild, neither too hot nor too cold, to tend to your aerial roots.
- Water your orchid thoroughly before starting the repotting process.
Disposal Methods for Old Pot and Soil
Once you've removed your orchid and its aerial roots from the old pot, don't just chuck it in the trash. Recycling is key here, folks!
- Clean and sterilize the old pot; it can be used again for other plants, even for those with roots.
- The old soil? Compost it! It'll work wonders in your garden.
Cleaning and Preparing Orchid Air Roots
Alright, folks! You've safely removed your orchid from its old pot. Now what? Well, it's time to clean up those air roots and prep them for their new home.
Proper Cleaning Procedures
First things first, let's give those air roots a good scrub down. No, not with soap and water! Instead, use a soft brush to gently remove any old soil or debris clinging onto the roots. Remember, we're aiming for a gentle approach here - you don't want to damage these vital lifelines, the roots of your orchid.
If there's stubborn dirt that won't budge, consider soaking the roots in lukewarm water for a few minutes. This should help loosen up the grime from the roots and make it easier to brush off.
Identifying Healthy vs Unhealthy Roots
Now that your air roots are squeaky clean, it's time for some health checks. Healthy roots are usually firm and greenish-silver in color. If the roots are brown or mushy - uh oh - we might have a problem on our hands!
Unhealthy roots can be a sign of overwatering or poor air circulation around the plant. Keep an eye out for these signs, such as issues with your orchid's roots, as they could indicate bigger problems with your orchid care routine.
Trimming Damaged Air Roots
Found some unhealthy roots? Don't panic just yet! With a pair of sharp sterilized scissors or pruning shears, carefully trim away any damaged or dead sections of the roots. Be sure to avoid cutting into healthy roots though – think of it like giving your orchid's root system a haircut!
For extra precaution against infection after trimming roots, dab some hydrogen peroxide on the cut areas. It helps prevent disease from spreading throughout the plant.
Prepping Cleaned Roots
Alrighty then! Your orchid’s air roots are now clean as a whistle and ready for their new digs. Before repotting, let the roots air dry a bit. This can help prevent root rot from setting in.
Also, consider misting their roots lightly with water to keep them hydrated. Orchids are epiphytes with roots that get most of their moisture from the air. So a little spritz here and there won't hurt!
So there you have it! A step-by-step guide on how to clean and prepare your orchid's air roots for repotting. With these tips, you'll be well on your way to ensuring the roots of your orchid thrive in its new pot.
Choosing the Right Soil and Planter
So, you've cleaned up your orchid air roots. Now, it's time to get them a new home.
Picking Your Planter
Choosing the right planter for your plant's roots is just as important as selecting the perfect prom dress or tuxedo. It isn't just about looks; it's also about compatibility. The size of your planter should be enough for your orchid's roots to comfortably stretch out. But remember, too much space can make your plant's roots feel lost and lonely.
Materials matter too! Some folks swear by clay pots for their plant roots, while others are team plastic all the way. Both have their perks:
- Clay pots: They're breathable, which means they allow excess moisture to escape, benefiting the roots.
- Plastic pots: They retain water longer, which could be a lifesaver for your plant's roots, especially if you're forgetful about watering.
Drainage capabilities? Absolutely crucial! Unless you want root rot knocking on your plant's roots, ensure that your chosen planter has sufficient drainage holes.
Orchid Mix Over Regular Soil
Think of specialized orchid mix as a VIP pass for your plant's roots. Roots give them access to all the right nutrients and conditions they need to thrive. Regular potting soil? Not so much.
Here's why:
- Orchid mix: Designed with bark pieces that provide excellent drainage and air circulation.
- Regular soil: Often retains too much water leading to over-saturation and potential root rot.
In other words, using an orchid mix is like choosing a custom-tailored suit over a one-size-fits-all deal - it just fits better!
Depth of Planter Matters
Just like Goldilocks in her quest for porridge perfection, finding the right depth for your planter can be tricky but essential. Too shallow may leave roots exposed while too deep might cause suffocation (not literally). So aim for something that’s 'just right'.
The Importance of Good Drainage
Imagine being stuck in a stuffy room with no ventilation - not fun, right? That's how your orchid feels when it's sitting in waterlogged soil. Good drainage is crucial for preventing root rot and maintaining a healthy plant.
So there you have it, folks! Choosing the right planter and soil is half the battle won in repotting an orchid with air roots. Remember, every decision you make affects your green buddy’s future health and growth. So choose wisely!
Repotting Process: Orchid Positioning and Soil Placement
Orchids are a bit picky. They need the right spot in their new home and the perfect soil bed to flourish.
Orchid Positioning for Optimal Growth
Epiphyte orchids, like most of their siblings, love being center stage. So, place them smack dab in the middle of your pot. It's not just about looking pretty though. This central location gives those air roots enough space to breathe and grow.
Tip: Ensure that the crown (the part where leaves start to sprout) is slightly above the rim of your pot. This way, water won't pool around it causing rot or disease.
Correct Soil Placement
Next up is soil placement. Remember, orchids aren't your average flower; they're epiphytes! In nature, they grow on trees with their roots exposed to air rather than buried in dirt.
When repotting these beauties, you shouldn't bury all those roots under soil. Instead, use a special orchid mix (as we discussed earlier). Cover only the bottom half or two-thirds of the root ball with this mix.
Remember: Be gentle when placing soil around roots - you don't want to damage them!
Space Between Plant Base and Planter Rim
Now let's talk about spacing. After repotting your orchid, ensure there’s plenty of room between its base and the planter rim. A gap of at least an inch is ideal.
Why so much space? Well, it helps ensure good air circulation (which orchids love), prevents waterlogging (which they hate), and allows for future growth.
Firm but Gentle Packing Down of Soil
Finally comes packing down that soil around your newly potted plant. Many novice orchid growers make a common mistake here: packing too tightly!
Yes, you want firmness so that your orchid is secure. But, you also need to ensure that those roots can breathe. So, pack the soil down firmly but gently.
Pro Tip: Use a chopstick or similar tool to help tuck the mix around the roots without compacting it too much.
Post-Repotting Care Guidelines
You've just repotted your orchid with air roots. Now, the real work begins: nurturing it back to full health.
Watering Schedule for Repotted Orchids
After repotting, your orchid needs a special watering routine. Avoid soaking it immediately after the process. Instead, give it a light misting daily for about a week. This will help the roots adjust to their new environment without getting waterlogged.
- Regular watering can resume after this period.
- Always remember that overwatering is a no-no! It's better to underwater than overwater.
Light and Temperature Needs
Your newly repotted orchid also needs proper lighting and temperature conditions to thrive. Place it in an area with bright but indirect sunlight; direct sunlight can scorch its leaves.
- Ideal temperatures range from 60°F to 75°F.
- Avoid drastic changes in temperature as they can stress out your plant.
Signs of Successful Repotting
Keep an eye out for signs that your orchid is adjusting well post-repoting:
- New growth: This includes new leaves or flower spikes.
- Healthy leaves: They should be firm and green, not yellow or droopy.
If you spot these signs, then kudos! You're on the right track with your care regimen!
When to Seek Professional Help
Sometimes, despite our best efforts, our plants show signs of distress post-repotting:
- Yellowing or wilting leaves
- No new growth even after several weeks
- Root rot
Don't panic if you notice any of these symptoms! It's time to seek professional help. A local nursery or plant shop should be able to provide advice tailored specifically to your situation.
Key Takeaways on Orchid Repotting
It's a wrap, folks! You've successfully navigated the ins and outs of repotting an orchid with air roots. Just like mastering a new recipe, it might seem daunting at first. But once you've got the hang of it, it's as easy as pie! Remember, your journey doesn't end here. The post-repotting care is just as crucial to ensure your orchid thrives in its new home.
So, what are you waiting for? Roll up your sleeves, put on that gardening hat and let your green thumb work its magic! And hey, don’t be a stranger - if you have any questions or need further assistance, we're here to help. Happy repotting!
FAQs
What type of soil is best for my orchid?
Orchids prefer well-draining soil mixtures such as bark mixes or sphagnum moss.
How often should I water my repotted orchid?
It depends on the type of orchid and the environment but generally once a week is sufficient.
When is the best time to repot my orchid?
The ideal time to repot an orchid is just after it finishes blooming when it begins a period of active growth.
Can I use regular potting soil for my orchids?
No, regular potting soil retains too much moisture which can lead to root rot in orchids.
How do I know if my orchid needs repotting?
If you notice yellowing leaves, poor growth or crowded roots growing out of the pot then these are signs that your plant may need repotting.
Should I cut off dead roots before repotting?
Yes, removing dead or rotten roots before repotting helps promote healthier growth.
Image Source: Paid image from CANVA