Did you know that the type of potting soil you use can make or break your orchid's growth, repot orchids, water orchids, and many houseplants? Orchids are delicate plants that require specific care, quality ingredients, and the right container for their well-being. Choosing the correct orchid potting soil ensures proper drainage, aeration, and nutrient availability, leading to healthy roots and vibrant blooms. In this guide, we delve into the world of orchids potting soil, exploring why it's essential for your orchids' health and how to select the best one for your plants. Stay tuned to discover the secrets to nurturing flourishing orchids with the right potting soil.
Key Takeaways
- Choose the Right Potting Mix: Select a well-draining orchid potting mix with ingredients like bark, perlite, and sphagnum moss for optimal growth.
- Repot Wisely: Repot orchids only when necessary, typically every 1-2 years, to prevent stress and promote healthy root growth.
- Proper Potting Technique: When potting your orchid, ensure the roots are positioned comfortably in the pot and avoid burying them too deeply.
- Monitor Aftercare: Maintain consistent watering and light conditions after repotting to support your orchid's adjustment to its new environment.
- Addressing Issues Promptly: Keep an eye out for common problems like root rot or pests and take immediate action to prevent further damage.
- Enhance Care Gradually: Once you've mastered the basics, consider advanced care tips like fertilizing schedules or adjusting humidity levels to elevate your orchid care skills.
Understanding Orchids Potting Soil
Importance of the Right Mix
When potting orchids, choose a well-draining mix, as inferior mixes can lead to root rot. This ensures that excess water doesn't accumulate around the roots.
For healthy root growth, opt for a mix with good aeration. This allows oxygen to reach the roots, promoting overall plant health and vitality.
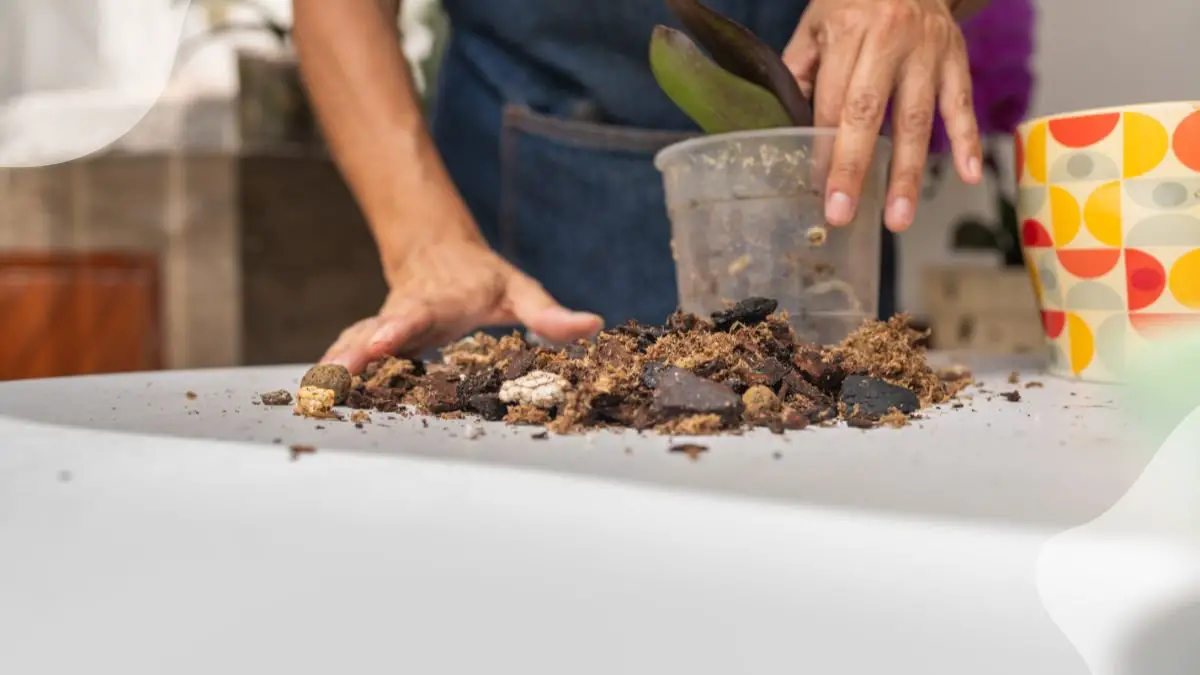
Mixes containing ingredients like sphagnum moss and fir bark are excellent choices. These components provide the necessary structure and moisture retention for orchids to thrive.
Signs of Bad Potting Mix
To identify potential issues with your potting mix, look for mold growth on the surface. Mold indicates excessive moisture levels, which can harm your orchid's roots.
Foul odors emanating from the potting mix are another red flag. This could indicate decomposition or bacterial growth, signaling an unhealthy environment for your orchid.
If the potting mix has broken down and become compacted, it's time for a change. Compacted soil restricts root growth and inhibits nutrient absorption, affecting the plant's overall well-being.
Purchase Options
Consider purchasing orchid potting mixes enhanced with added nutrients. These mixes provide essential elements for orchid growth, ensuring they receive proper nourishment.
Look for mixes specifically formulated for orchids. These blends, mixes, are tailored to meet the unique requirements of orchids, providing them with the ideal growing medium.
For those inclined towards a more natural approach, organic potting mixes options are available. These mixes are free from synthetic chemicals, promoting a healthier environment for your orchids to flourish.
Preparing for Repotting
Assessing Your Orchid's Needs
When repotting your orchid, examine the roots to ensure they are not overcrowded in the current pot. This overcrowding can hinder growth and lead to root rot. Check the overall health of the orchid by inspecting the leaves, stems, and roots for any signs of disease or damage. Evaluate the growth rate of your orchid to determine how frequently it needs repotting based on its growth patterns.
Choosing the Right Time
Wait for your orchid to finish blooming before initiating the repotting process. Repotting during this period allows the plant to focus its energy on root establishment rather than flower production. Choose to repot during the orchid's dormant period when it is not actively growing. Repotting during dormancy minimizes stress on the plant and increases the chances of a successful transition. Avoid repotting during active growth phases as this can shock the plant and disrupt its development.
Gathering Necessary Tools
Prior to repotting your orchid, prepare scissors or pruning shears for trimming any unhealthy or overgrown roots. These tools will help you maintain a healthy root system during the repotting process. Have a new pot ready that is slightly larger than the current one to accommodate the orchid's growing roots. Ensure the new pot has proper drainage holes to prevent waterlogging. Keep cinnamon powder handy as it acts as a natural fungicide, protecting the newly trimmed roots from infections.
Repotting Step by Step
Removing the Orchid Carefully
Gently loosen the roots to avoid damaging them, ensuring a smooth transition to a new pot. Avoid forceful pulling that can harm the delicate root system. Handle the orchid with care, paying close attention to prevent any breakage of the fragile stems.
Dealing with Tangled Roots
Untangle roots gently using your fingers, ensuring no damage is caused during the process. Trim any excessively tangled roots to promote healthy growth and development. Spread the roots evenly in the new pot to provide ample space for future growth and nourishment.
Trimming Dead Roots
Identify and remove any mushy or discolored roots to maintain the overall health of the orchid. Trim roots cleanly near the base to prevent any further decay or spread of infection. Cutting roots close to the base ensures optimal healing and regeneration for the plant.
Cleaning the Root System
Rinse the roots gently under lukewarm water to eliminate any remnants of old potting media effectively. Thoroughly inspect the roots for any remaining debris or dirt that might hinder growth. Allow the roots to air dry completely before repotting to prevent any potential infections from developing.
The Ideal Potting Mix
Ingredients for Health
When selecting a houseplant soil for your orchids, opt for a blend that includes quality orchid mixes. These mixes typically consist of bark, sphagnum moss, and perlite. The bark provides stability and aeration, while the sphagnum moss retains moisture and nutrients. Perlite adds porous mix to allow proper drainage.
Choose a potting mix rich in organic materials to ensure your orchids receive essential nutrients. Look for ingredients like coconut husk chips, charcoal, or tree fern fiber. These components aid in maintaining the right balance of air circulation and moisture retention crucial for orchid health.
Adding Cinnamon Benefits
Incorporating cinnamon into your potting mix offers numerous benefits for your orchids. Cinnamon possesses antifungal properties that help prevent root rot and other fungal infections. Sprinkling a small amount of cinnamon powder on the soil surface can also deter pests from attacking your plants.
Cinnamon acts as a natural fungicide, protecting your orchids from harmful pathogens that thrive in warm, moist environments. This spice is a safe and effective way to promote healthy root growth and overall plant vitality without the use of harsh chemicals.
Mix Customization Tips
Customizing your potting mix allows you to tailor it to the specific needs of your orchids. Experiment with different ratios of bark, sphagnum moss, and perlite to find the ideal balance for your plants. Consider adding additional ingredients such as coconut husk chips or charcoal to enhance aeration and drainage.
Mixing in small amounts of slow-release fertilizer can provide your orchids with a steady supply of nutrients over time. Be cautious not to over-fertilize, as this can lead to nutrient imbalances and damage to the plant roots. Regularly monitor your orchids' growth and adjust the mix accordingly based on their performance.
Potting the Orchid
Filling the Pot Correctly
When potting orchids, ensure the container has drainage holes to prevent waterlogging, promoting healthy orchid roots. Use a mix of orchid bark and perlite for optimal aeration and drainage.
To fill the pot, start by placing a layer of orchid bark at the bottom, followed by the new orchid ensuring its roots are spread out. Add more orchid bark around the plant, gently pressing it down to secure the fresh orchid in place.
Positioning the Orchid
Position the potted orchids in an area with indirect sunlight, avoiding direct exposure that can scorch the leaves. Rotate the pot weekly to ensure even growth and prevent the phalaenopsis orchid from leaning towards the light source.
For indoor orchids, maintain a temperature range of 65-85°F during the day and slightly cooler at night. Keep humidity levels between 50-70% to mimic their natural tropical environment, promoting healthy growth.
Final Touches
After potting your orchid, water it thoroughly until excess water drains out of the bottom. Allow the top inch of the orchid bark to dry before watering again to prevent root rot. Fertilize monthly with a balanced orchid fertilizer to provide essential nutrients for blooming.
To enhance growth, consider using a clear plastic pot within a decorative outer container to monitor root health without disturbing the plant. Regularly inspect for pests like spider mites or aphids and treat promptly to prevent infestations.
Aftercare Essentials
Watering After Repotting
After repotting an orchid, ensure to adjust the watering routine accordingly. Orchids in new potting soil may require less frequent watering initially. Allow the plant to adjust to its new environment before resuming regular watering schedules.
- Pros: Prevents overwatering and root rot.
- Cons: Risk of underwatering if not monitored closely.
Check the moisture level in the potting mix by inserting a finger about an inch deep. If it feels dry, then it's time to water the orchid. Avoid letting the roots sit in water as this can lead to root rot.
Resuming Care Routine
Once the orchid has settled into its new potting soil, resume its care routine gradually. Start reintroducing fertilization after about a month, ensuring to dilute the fertilizer to prevent shock to the plant.
- Key Information: Gradually acclimate the orchid to its regular light conditions after repotting.
- List of Examples: Begin with indirect sunlight and slowly increase exposure over a few weeks.
Maintain consistent humidity levels around the orchid, especially if you live in a dry climate. Consider using a humidity tray or a humidifier to create an optimal environment for your orchid.
Monitoring Growth and Health
Keep a close eye on your orchid's growth and overall health post-repotting. Look out for any signs of stress or decline in health, such as yellowing leaves or wilting flowers. Address any issues promptly to prevent further damage.
- List of Examples: Watch for new growth, which indicates that the orchid is adapting well to its new potting soil.
- Key Information: Regularly inspect the roots for any signs of disease or rot.
Maintaining a consistent care routine is crucial for the long-term health of your orchid. Adjust watering, light exposure, and fertilization as needed based on the plant's response to its new potting soil.
Troubleshooting Common Issues
Addressing Root Rot
Root rot is a common issue in orchids caused by excessive moisture in the potting soil. To address this problem, inspect the roots for any signs of rot, such as mushy texture or dark coloration. Trim away the affected roots using sterilized scissors to prevent further spread. Repot the orchid in fresh, well-draining potting mix to promote healthy root growth.
Fixing Over or Underwatering
Overwatering can lead to root rot, while underwatering can result in dehydration and wilting. To fix overwatering, allow the soil to dry out before watering again and adjust your watering schedule accordingly. For underwatered orchids, increase watering frequency but ensure proper drainage to prevent waterlogging. Monitor the plant's symptoms closely to determine the appropriate watering routine.
Pest and Disease Management
Orchids are susceptible to pests like aphids, mealybugs, and spider mites, as well as diseases such as fungal infections and bacterial rots. Combat pests by isolating infected plants, using insecticidal soap, or introducing natural predators like ladybugs. For diseases, prune affected areas, improve air circulation, and avoid overhead watering to prevent fungal growth. Regularly inspect your orchids for early signs of pest infestations or diseases to take prompt action.
Advanced Care Tips
Enhancing Blooming
Orchids require different care to enhance blooming. Ensure they receive adequate light, typically filtered sunlight. Watering should be consistent but avoid overwatering as it can lead to root rot.
To boost blooming, consider using a fertilizer with higher phosphorus content during the growing season. Repotting orchids can also stimulate blooming by providing fresh nutrients and space for root growth.
Seasonal Adjustments
Make seasonal adjustments to cater to your orchid's changing needs. During winter, reduce watering frequency as orchids enter a dormant phase. Increase humidity levels by placing a tray of water near the plant.
In summer, provide ample ventilation to prevent heat stress. Consider moving orchids to shadier spots or using sheer curtains to filter intense sunlight. Adjust watering schedules based on the plant's response to seasonal changes.
Long-term Soil Health
Maintaining long-term soil health is crucial for orchids' overall well-being. Use a well-draining potting mix specifically formulated for orchids to prevent waterlogging. Regularly check the soil's moisture levels and adjust watering accordingly.
Consider repotting orchids every 1-2 years to refresh the potting mix and prevent compacted roots. Monitor the plant for any signs of pests or diseases, such as yellowing leaves or unusual spots, and take prompt action to address issues.
Final Remarks
In this guide, you've learned about the importance of using the right potting soil for your orchids. By understanding the specific needs of these delicate plants and following the step-by-step repotting process, you can ensure they thrive and bloom beautifully. Remember, the ideal potting mix is crucial for providing the necessary nutrients and aeration for your orchids to flourish.
Now that you've mastered the art of repotting orchids and caring for them post-repotting, you can enjoy a stunning display of vibrant blooms. If you encounter any issues along the way, refer back to our troubleshooting guide for solutions. Keep exploring advanced care tips to elevate your orchid-growing skills and create a lush oasis in your home. Happy gardening!
Frequently Asked Questions
### What is the importance of using the right potting soil for orchids?
Using the right potting soil ensures proper drainage and aeration, preventing root rot and promoting healthy orchid growth. It provides necessary nutrients and stability for the orchid roots to thrive.
### How often should I repot my orchid?
Orchids generally need to be repotted every 1-2 years or when you notice overcrowding in the pot. Repotting allows fresh nutrients and space for root growth, enhancing the overall health of the plant.
### What are the key components of an ideal potting mix for orchids?
An ideal potting mix for orchids consists of materials like fir bark, sphagnum moss, perlite, and charcoal. These components provide a well-draining, aerated environment that mimics the orchid's natural habitat, promoting healthy root development.
### How can I troubleshoot common issues with my orchid's potting soil?
Common issues like soggy soil, mold growth, or compacted mix can be resolved by adjusting watering frequency, ensuring proper ventilation, or repotting with fresh mix. Regularly inspect your orchid's roots and soil to address any issues promptly.
### What are some advanced care tips for maintaining orchids in optimal potting soil conditions?
Advanced care tips include monitoring humidity levels, adjusting fertilization based on growth stages, and considering semi-hydroponic setups for specific orchid species. Regularly check for pests, maintain proper air circulation, and provide appropriate light exposure for healthy orchid growth.
Image Source: Paid image from CANVA


