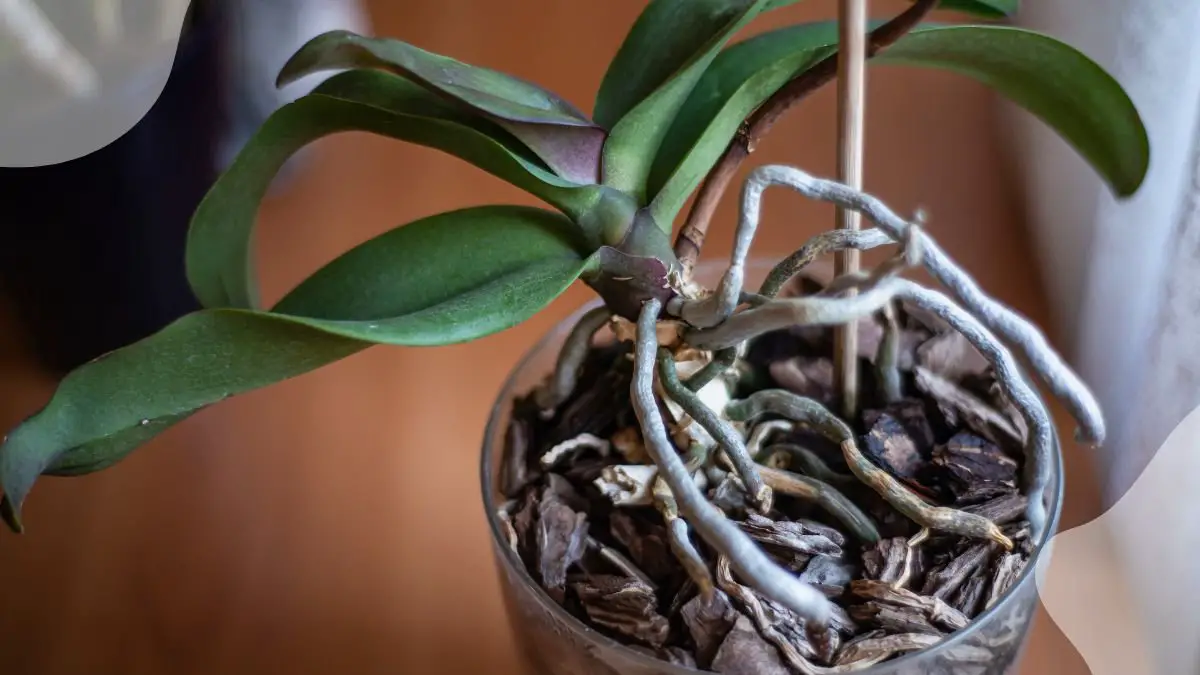
Ever wondered what to do when you spot your orchid plant roots growing out of the pot? The sight can be alarming, but fret not! In this guide, we'll delve into the reasons behind this phenomenon and provide you with practical solutions, including easy repotting tips, to tackle this common issue. From understanding why orchid roots escape their pots to learning how to repot them correctly, we've got you covered. Stay tuned to discover expert tips on caring for your orchids and ensuring they thrive in their new environment.
Key Takeaways
- Recognize the Need to Repot: Keep an eye out for overcrowded roots growing out of the pot, signaling the need for repotting to ensure your orchid's health and growth.
- Gather Your Repotting Supplies: Prepare all necessary materials such as fresh potting mix, a new pot, scissors, and gloves before starting the repotting process for a smooth transition.
- Follow a Step-by-Step Repotting Guide: Adhere to a structured repotting procedure to prevent damage to the delicate roots and promote successful acclimation of your orchid to its new environment.
- Understand Air Roots: Learn about air roots and their importance in orchids' natural growth cycle, respecting and handling them carefully during the repotting process.
- Provide Post-Repotting Care: After repotting, maintain proper care by adjusting watering frequency, monitoring light exposure, and ensuring adequate humidity to support your orchid's recovery.
- Spot and Address Orchid Sickness: Be vigilant for signs of orchid sickness post-repotting, such as yellowing leaves or root rot, and take prompt action by adjusting care routines or seeking professional help if needed.
Recognizing the Need to Repot
Check Roots in Drainage Holes
When checking your orchid plant, look for white roots growing out of the pot's drainage holes to determine if it's time to repot orchids. This indicates that the roots have outgrown their current space and need more room to grow.
Inspecting the roots is crucial as it helps you understand the plant's health and whether it needs repotting. If you see roots escaping through the drainage holes, it's a clear sign that the plant is root-bound.
Look for Crowded Roots
Another indicator that your orchid needs repotting is when you notice crowded roots pushing out of the pot. This occurs when the roots have filled up the pot entirely, leaving no room for further growth.
When roots become tightly packed, they can't absorb nutrients efficiently, affecting the plant's overall health. By repotting the orchid into a larger container, you provide ample space for healthy root development.
Examine Potting Mix Breakdown
examine the potting mix for signs of breakdown. Over time, the potting medium breaks down, losing its structure and becoming compacted.
A breakdown in the potting mix affects drainage and aeration, leading to waterlogged soil and root rot. By observing the condition of the potting mix, you can determine if it's time to repot your orchid plant.
Signs Your Orchid Needs Attention
Tangled Roots
Notice any tightly tangled roots indicating root-bound conditions. Root-bound orchids may exhibit slow growth and require more frequent watering. To address this, gently loosen the roots during repotting to encourage healthy growth.
Container Size
Observe if the orchid has become too large for its current container. Large orchids in small pots can lead to overcrowding, restricting root growth and water absorption. Transferring the orchid to a larger pot will provide ample space for continued development.
Potting Mix
Watch for signs of the potting mix needing replacement. Old potting mix can become compacted, hindering drainage and airflow essential for root health. Refreshing the mix during repotting will ensure proper aeration and moisture levels for the orchid.
Gathering Your Repotting Supplies
New Pot
When it comes to repotting your orchid with roots growing out of the pot, gather a new pot that is slightly larger in diameter than the current one. Ensure the new pot has proper drainage holes to prevent waterlogging.
Fresh Orchid Potting Medium
Prepare fresh orchid potting medium for repotting your houseplant. Use a mix specifically designed for orchids, ensuring good aeration and drainage to support healthy root growth.
Scissors or Pruners
Have scissors or pruners ready to trim off dead roots when repotting your orchid plant. Trimming off dead roots helps promote new root growth and prevents potential issues like root rot.
Step-by-Step Repotting Guide
Gently Pulling the Orchid Out
When removing the orchid from its pot, gently pull it out to prevent root breakage. Carefully hold the base of the plant and avoid tugging forcefully.
Loosening the Root Ball
To ensure healthy growth, loosen the root ball gently. This step helps in promoting better nutrient absorption for the orchid.
Removing Old Growing Medium
Remove the old growing medium by gently shaking off excess soil. Be cautious not to damage the delicate roots during this process.
Placing Orchid in a New Pot
When placing the orchid in a new pot, ensure proper positioning. The roots should be spread out evenly to encourage outward growth.
Ensuring Adequate Drainage
Check that the new pot has adequate drainage holes at the bottom. Proper drainage is crucial to prevent waterlogging, which can lead to root rot.
Choosing the Right Pot Size
Select a pot that is just slightly larger than the previous one. A pot that is too large can hold excess moisture, leading to root issues.
Understanding Air Roots
Purpose
Air roots in orchids serve a crucial purpose in the plant's overall health and growth. Unlike regular roots that absorb water and nutrients from the soil, air roots are specialized structures that primarily function to absorb moisture and nutrients from the air. These aerial roots are essential for orchids, especially in their natural epiphytic habitat where they cling to trees rather than grow in soil.
Health Contribution
The presence of air roots is a sign of a healthy orchid plant. These roots play a vital role in helping the plant adapt to various environmental conditions, such as low humidity or limited access to water. By absorbing moisture and nutrients directly from the air, air roots supplement the plant's regular root system, ensuring its overall well-being and survival. air roots aid in anchoring the orchid to its growing surface, providing stability and support.
Regular Roots vs. Air Roots
Distinguishing between regular roots and air roots is essential for understanding an orchid's unique root system. While regular roots grow into the potting medium to absorb water and nutrients, air roots extend outside the pot into the surrounding air. Regular roots are typically thicker and covered in a protective layer to prevent dehydration, whereas air roots are thinner, more delicate, and often appear silvery or grayish due to their exposure to air.
Pros and Cons
- Pros:
- Enhanced absorption of moisture and nutrients.
- Improved adaptability to varying environmental conditions.
- Additional stability and support for the plant.
- Cons:
- Vulnerable to drying out if not provided with sufficient humidity.
- Prone to damage if mishandled during repotting or maintenance.
Post-Repotting Care Tips
Bright Light
Keep the repotted orchid in bright, indirect light to promote healthy growth and blooming. Ensure it receives enough sunlight without direct exposure to prevent leaf burn.
Watering Schedule
Water the orchid when the potting mix is about to dry, usually every 7-10 days. Check the moisture level by inserting a finger into the soil about an inch deep.
Repotting Frequency
Different orchid types have varying needs for repotting. Understand the specific requirements of your orchid species to determine the ideal frequency.
Benefits of Bright Light:
- Promotes photosynthesis for healthy growth
- Encourages blooming and vibrant flower colors
Cons of Overwatering:
- Leads to root rot and fungal diseases
- Causes yellowing leaves and wilting flowers
Steps to Determine Repotting Frequency:
- Research the specific orchid species you have.
- Observe the root growth and health post-repotting.
Spotting and Addressing Orchid Sickness
Signs of Orchid Sickness
Common orchid problems can manifest post-repotting, such as orchid root health issues. Look for signs like yellowing leaves or orchid flower spike wilting, indicating stress. If you notice many orchid experts suggest checking the roots for signs of distress.
Addressing Yellowing Leaves
Yellowing leaves are a clear indication of an underlying issue with the plant. To tackle this, carefully inspect the roots for any signs of orchid root rot. Trim away any affected areas using sterile tools to prevent further spread. Replant the orchid in fresh new orchid bark to promote healthy growth.
Reviving a Sick Orchid
To revive a sick orchid, focus on providing optimal care conditions. Ensure the plant receives adequate light, water, and humidity levels suitable for terrestrial orchids. Consider adjusting the watering schedule to prevent overwatering, a common cause of root rot. Implement a feeding routine with appropriate orchid fertilizers to support recovery.
FAQs on Orchid Repotting
Reusing Potting Mix
When repotting orchids, avoid reusing the old potting mix as it can lead to various issues. Reusing potting mix may introduce pests or diseases to the new pot, affecting the health of your orchid.
Using fresh potting medium is crucial for maintaining the health of your orchid plant. Fresh potting medium provides proper aeration and drainage for the roots, promoting healthy growth.
Impact on Orchid Health
Reusing potting mix can impact the overall health of your orchid plant. Old potting mix may have deteriorated nutrients, leading to deficiencies that can affect the growth and flowering of your orchid.
By understanding the importance of using fresh potting medium, you ensure that your orchid has access to essential nutrients for healthy development. Fresh potting medium supports root growth and overall plant vitality.
Benefits of Fresh Potting Medium
- Improved aeration and drainage
- Prevents pest infestations
- Provides adequate nutrients for growth
Closing Thoughts
You've learned the crucial signs indicating your orchid needs repotting, how to execute the process step by step, and post-repotting care essentials. Recognizing these indicators promptly and taking action can ensure your orchid's health and vitality. By understanding air roots and addressing any signs of sickness promptly, you're well-equipped to provide optimal care for your beloved plant.
Ensure the longevity and flourishing growth of your orchid by staying vigilant, following the repotting guidelines, and providing the necessary post-care attention. Your orchid will thank you with vibrant blooms and robust health. Keep nurturing your green companion with the knowledge you've gained to enjoy its beauty for years to come.
Frequently Asked Questions
How often should I repot my orchid plant?
It is recommended to repot your orchid plant every 1-2 years. Signs such as overcrowded roots or poor drainage indicate the need for repotting.
What type of potting mix is best for orchids?
Use a well-draining mix specifically formulated for orchids, like bark chips or sphagnum moss. This allows proper aeration and prevents root rot.
Can I reuse the same pot when repotting my orchid?
Yes, you can reuse the same pot if it's in good condition. Ensure it's thoroughly cleaned and sterilized before replanting to prevent diseases.
Should I cut off healthy air roots during repotting?
Avoid cutting off healthy air roots as they play a crucial role in nutrient absorption and stability. Trim only damaged or rotten roots during repotting.
How do I know if my orchid is sick after repotting?
Watch for signs like wilting leaves, yellowing, or mold growth post-repotting. Adjust watering and light conditions accordingly and monitor the plant's progress closely.
Image Source: Paid image from CANVA


